
If you need to distribute your Lumi resource to your supervisor/users, follow the instructions in section 1 only. If you are completing final submission, go through sections 1-3.
1. Get a link or embed code for sharing
IMPORTANT NOTE: The exports will NOT be dynamic. This means that when you make further edits to the .h5p file in the Lumi desktop application after you have exported the HTML file; those changes will not be reflected. You will have to repeat the processes below. This is particularly relevant when it comes to final submission.
1a) Exporting your Lumi resource
This section will demonstrate how to export your Lumi resource (.h5p file) as a HTML file. You will need this HTML file in order to share your resource via an online link, and also to embed it into other online resources. You will need to keep the .h5p file and upload this as part of your ‘Build Files’ later in the submission process. See Step 3 at the bottom of this page for more information about this.
- Within the Lumi desktop application, once you are finished with editing your resource, click to the top-left and select File.
If you are creating multiple H5P files at the same time, ensure that you are working within the tab for the resource that you want to export on the left hand menu.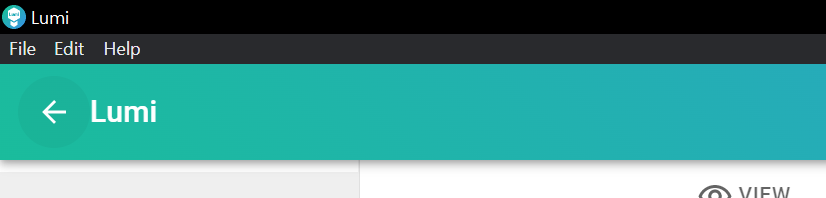
- Once you have selected File, you will see a list of options. From that list, click Export.
A new dialog window called Export Settings will appear. - The Export settings to select are:
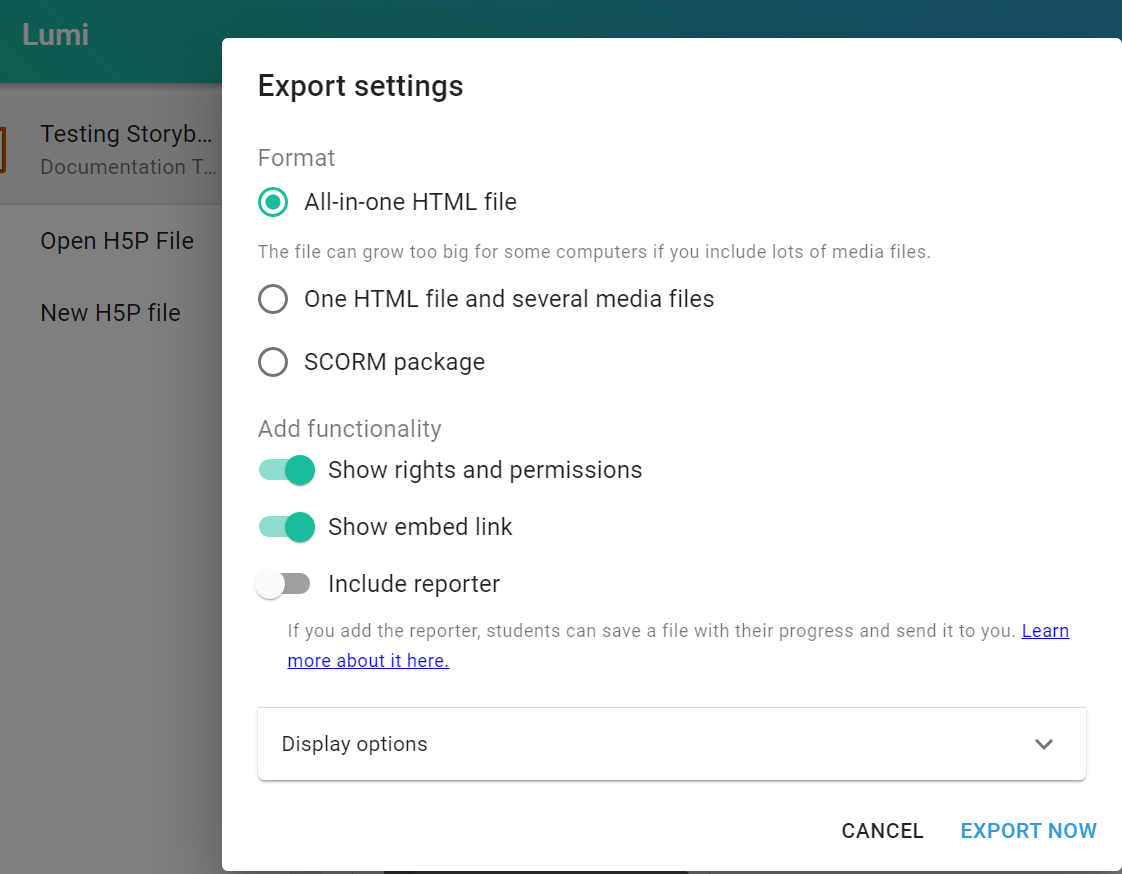
- For Format, select All-in-one HTML file (preferable).
- You may need to select the One HTML and several media files option. This option tends to be used for Lumi resources with uploaded content such as videos.
For Add functionality, select:- Show rights and permissions
- Show embed link
- For Format, select All-in-one HTML file (preferable).
- Once the settings are like the picture above, click ‘Export Now’ on the bottom right of the Export Settings dialog window.
- You will then see options for where you would like to Save the HTML file and what the File name should be.
When saving, if there are any spaces in the file same, please add an underscore ( _ ) where the spaces are. This is so there are no spaces in the file name. Also please do not use an punctuation in the file name as this will cause issues when it comes to uploading your file.
Example: SCP Resource Planner 2324.html would become SCP_Resource_Planner_2324.html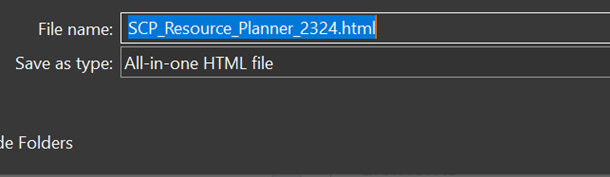
Once you have created an appropriate file name, click export. - Lastly, we will need to zip the html file so there is no difficulty in the upload process. After you have exported your HTML file, go to its file location. Next, right-click the file and select Send to, then click Compressed (zipped) folder.
There should now be a zip file with the same name as your exported HTML file.
If you had to use the One HTML file and several media files option, please collect the HTML file and the media files into one folder. After that, follow the procedure above to zip the folder.
1b) Uploading your Lumi resource
This section will explain how to upload your exported HTML file onto the Upload Site for distribution and final submission.
- After the export is completed, go to the Upload Site. Click Login to access the file upload area. Follow the usual steps to login.
- Once logged in, you will see the file upload area (see below).
- Next, open the file location of the zip file of the exported resource from Lumi.
- Once you have located the zip file, drag and drop it into the upload area.
You should see some notifications that the file upload process is taking place. - Once you see in the file list, it has successfully uploaded when you see the zip file in the file upload area.
- After that, right click on the zip file and from the menu that appears, go to Extract Files from archive and select New Folder.

You should then see a duplicate folder of the zip file you have just uploaded, but this will now be a Folder and not a ZIP archive.
1c) Getting a shareable link
This section will explain how to retrieve the link / URL to your Lumi resource once it has been uploaded to the Upload Site.
You can send this link to your Users/Supervisor directly and also include it on your cover page for final submission.
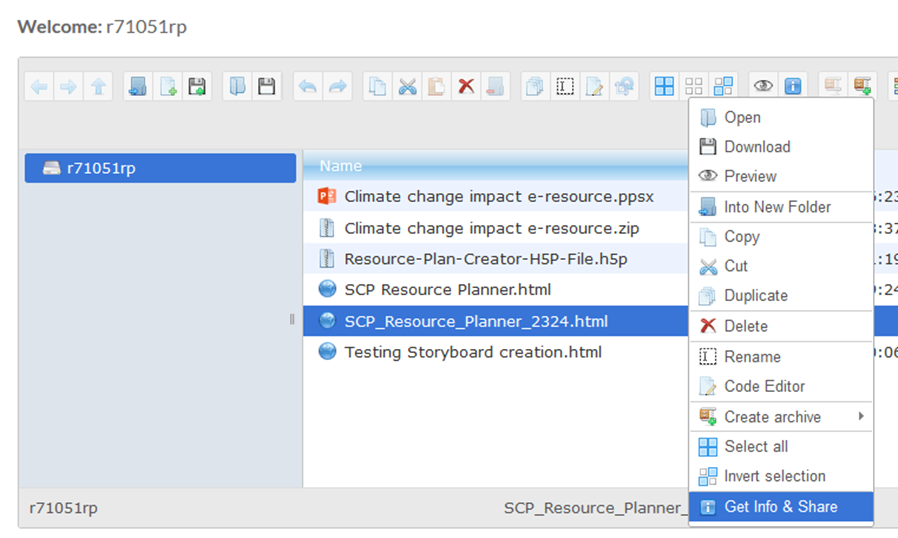
- Right click on your .html file in the upload site folder.
- From the dropdown menu that appears, click Get Info & Share. It is at the bottom of the menu.
- After that a pop-up window will appear called Selection Info.
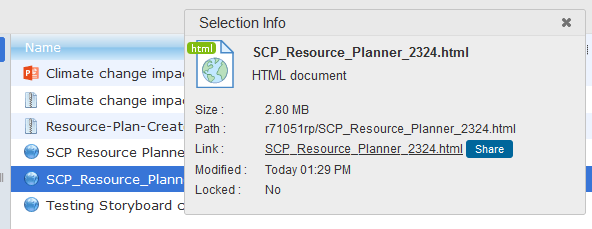
Click on the hyperlinked text in the “Link:” row (DO NOT click Share, this will not work). This will open your resource in a new tab on your browser. - To retrieve the link/URL, simply Copy (Ctrl/CMD+C) the URL of the tab where your resource is displayed.
1d) Getting an embed code
This section is for those who would want to combine their Lumi resource with another resource. For example, you may want to embed your resource on a section of your Wix website.
- Open your resource link that you retrieved from the Get Info & Share option on the Upload Site. See the previous section, 1c) for details.
- Once you have opened it, you will see there should be an embed option on the bottom of the resource.
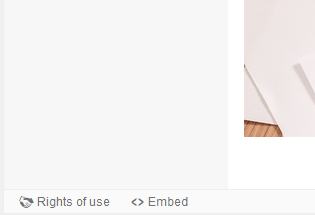
Click on the text ‘Embed’. - The following pop-up will appear:
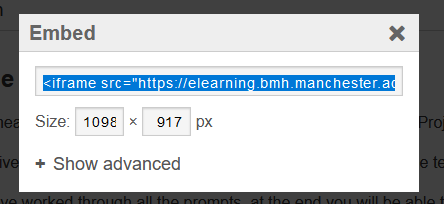
Select all of the embed code by clicking within the box and using Ctrl/CMD+A and copy it (Ctrl/CMD+C). - Now you can use this embed code to insert your uploaded Lumi resource into other software if needed.
If you are struggling to know how to use the embed code in other software, contact the eLearning team either in a SCP workshop on campus or online in the SCP Teams space.
Expand this section for instructions on how to export your Lumi resource and host it online. This includes:
1a) Exporting your Lumi resource
1b) Uploading your Lumi resource
1c) Getting a shareable link
1d) Getting an embed code
2. Create and submit your cover page
If you are submitting ANY resources as part of your final submission (e.g. an eLearning resource, media resource, videos, paper resource, lesson plans, etc) then you need to create a cover page. This is how you present your work to your markers. If you don’t have a cover page, they will not be able to see your resources.
DO NOT LEAVE THIS TO THE LAST MINUTE. eLearning check all cover page links for any issues. If there is a problem, it may take a couple of days to fix. It is strongly advised that you aim to submit your cover page sometime during the week before the final deadline. eLearning will hold upload sessions to help you with this.
Download and fill in the cover page template
- Go to the Blackboard course and navigate to Assessment/Submissions > Uploading Resources for Hosting or Final Submission section.
- Download the SCP_Cover_Page.docx from ‘Step 1: Submitting Additional Files’
- Add your username to the end of the file name and make sure any spaces are replaced with underscores, e.g. SCP_Cover_Page_mfbx9alp.docx
- Open the file and fill in all sections. When you are adding your description and links, make sure you add any access instructions e.g. best viewed on Google Chrome, designed to be viewed on an iPad, etc.
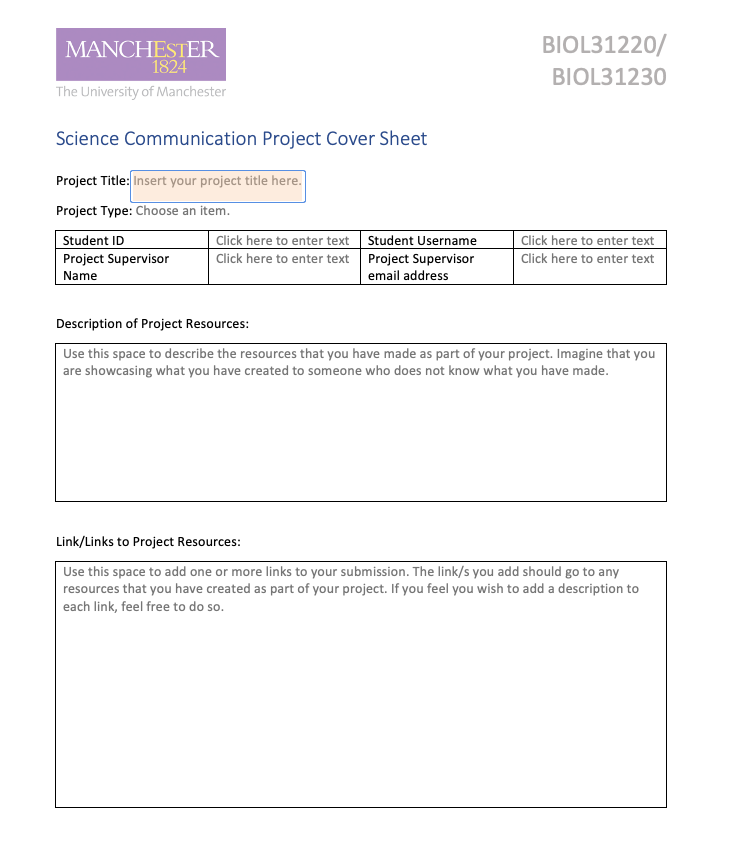
- Once finished, save the cover page as a PDF file with the same name, e.g. SCP_Cover_Page_mfbx9alp.pdf
See this help page if you have any issues converting to PDF.
Upload to our eLearning site
- Click on the button below to log in to the file upload page with your university account
- Once logged in, you will see the file upload area
- Drag and drop your PDF into the upload box
- When it has uploaded, right click on the file and choose ‘get info and share’
- Click the link to the file (NOT share) and your cover page will open in a new tab
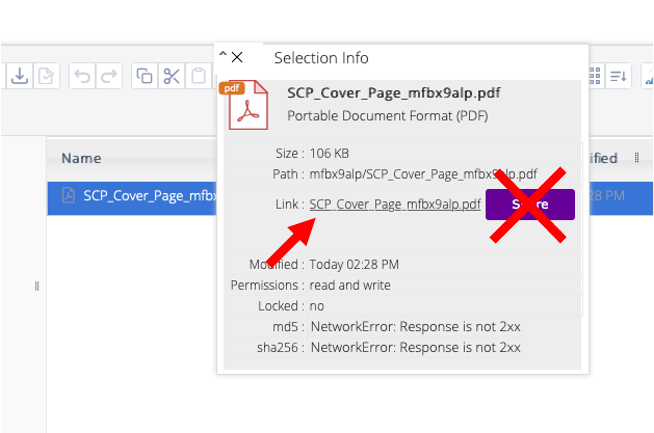
- Copy the URL and paste it somewhere that you can save and find later (e.g. email it to yourself or save in a word document). Use this link to test that your cover page and all resource links on it work as expected.

- This is the link that you use for your final submission of your resources. NOTE – if your link does not start with https://elearning.bmh.manchester.ac.uk/scp/wp-content/uploads/sites/25/wp-file-manager-pro/users/ then something has gone wrong, take another look at the instructions above or come to a workshop for help.
- Fill in the google form located in the Blackboard course in Assessments/Submission > Final Report Submission > Step 2: PLEASE COMPLETE: Project title/Resource Link/Student info BIOL31220/31320
ALL project types fill this in, so you will be asked towards the end of the form whether you need to submit a link to your cover page. If you select ‘Yes’ there will be a box to paste your link.
You will not get an email receipt for this submission. eLearning check all cover page links and you will be contacted individually if there is a problem. If you don’t hear from us, that is a good sign!
Once you have submitted this form, you will need to upload your ‘build files’ and copyright information. See the next section for instructions.
Expand this section for instructions on how to create your cover page and obtain a link for final submission. You do not need to create a cover page to send your work to your supervisor or to collect data.
3. Build files and copyright information
The last thing you need to upload to our eLearning site are your build files and copyright information. We need these to investigate if there is a problem with your resource during marking, or if your supervisor would like to re-use your resources later.
Create a new folder on your computer called ‘Build Files’ and add the following information, A and B. Once you have gathered the files together you will need to upload the whole folder to our file upload site. All instructions are detailed below.
A) Copies of anything you have created yourself
This could be images you’ve created on your computer, photographs you have taken, videos you’ve produced, audio files you’ve recorded, animation files prior to export, H5P files from Lumi, etc. The important thing about these is that they are original works and are not available elsewhere. This means we need a copy of them. You can upload these in their original format (such as .png image, a .mp4 video file, a .h5p Lumi file). Please give the files a meaningful name to make identifying them easier if possible.
Note for iSpring users: If you have created an iSpring resource, your build files should also include a copy of your powerpoint presentation and associated folder.
B) A list of items you found online
E.g. images from a stock library, a video from social media, etc. You do not need to upload a copy of these files as they will be available elsewhere, but you do need to tell us where you found them. One of the simplest ways to accomplish this is to create a three column spreadsheet:
- Column 1: Item details
Identify the item clearly. This could be the figure number, or a more descriptive identifier (“the video on slide 3” for example). - Column 2: Link
Paste a link to where you found it. This should be the original source, not just a google image search result. In some cases you may not need a link (for example, motifolio images taken from the Blackboard site, or stock images provided in powerpoint and Moovly). In these cases, note that they are stock images from a specific piece of software or provided through the Blackboard course. - Column 3: Copyright status
State the copyright status of the item. You should have already been aware of this when choosing to use it in your resource, e.g. public domain, a specified CC license, or note that the item is copyrighted and you have permission to use it from the owner.
Please note that references in your report or in your resource itself are not sufficient for this second part, as these will not usually include the copyright status of an item. A separate spreadsheet as described above is required.
Upload your folder to our eLearning site
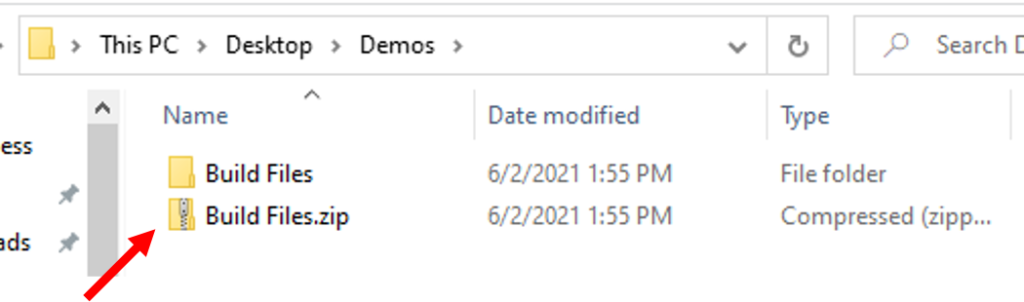
- Put your files from section A and your spreadsheet from section B into a folder on your computer called ‘Build Files’
- Compress this folder into a .zip file
On windows – right click the folder and choose send to > compressed folder
On a mac – right click the folder and choose compress - You should end up with a .zip file called ‘Build Files’
- Click on the button below to log in to the file upload page with your university account
- Once logged in, you will see the file upload area
- Drag and drop your .zip file into the upload box. If you have a lot of files, this may take a little time.
- Once it has finished uploading, you are done.
Expand this section for instructions on uploading your build files and copyright information.