
This guidance is also available as a PDF which can be shared with staff and students: Podcast Guide for Undergraduate Medicine, University of Manchester.
Thanks for recording content for our podcast series. We have created some guidance to assist you. The purpose of this is to ensure that our podcast recordings have consistency of content, style, quality, and length within a series.
- Pre-production preparation
- Recording (production)
- General podcast structure
- University of Manchester: Media Services podcasting suite
- Sound checks
- Recording online (Zoom)
- Post-recording (post-production)
The 1Med Learn Podcast includes two series – in brief and in-depth (see below):
| Series | Content | Length |
| In brief | Concise overview of a particular topic or condition (e.g. presentation, diagnosis, and management.) Everything you need to know to be a safe and effective FY1. | Up to 10 minutes |
| In-depth | This more in-depth pod explores a presentation or clinical area with the purpose of demystifying it. This may include a focus on the student perspective, challenges, and clinical reasoning. | Up to 30 minutes |
Pre-production preparation
If you are recording virtually, set up a Zoom meeting with the guest at the agreed time and send the link in advance of the meeting (with the permission release forms). Make sure that you allow time for introductions and any re-recording.
Prepare any notes and think about some questions beforehand. As the host, it is good practice to brief the guest on the general podcast structure and the types of questions that will be asked. Share questions with the guest before recording.
Tips
- Find a quiet place to record and turn off any devices, such as mobile phones.
- Do a quick sound test before conducting the interview, to make sure voices are clear.
- Brief the guest on the general structure and the types of questions that will be asked.
- While it’s good to have question topics prepared, try not to read from a script.
- Listen to what the guest is saying as it may prompt some different questions. Don’t feel like you must rigidly stick to your questions if another interesting point comes up.
- Use non-verbal communication during the recording to engage with and encourage your guest.
- If anyone is unhappy with an answer, you can respond again on the same recording and make some adjustments when editing.
- Try to speak clearly and slowly.
- Consider asking the guest if they have any final top tips to share when reaching the end of your chat.
Recording (production)
You can record the episode virtually using an online meeting platform like Teams or Zoom (Low to High Quality), or in person using the University of Manchester’s Media Services podcasting suite (Highest Quality).
Take some time to greet the guest(s) when you start your meeting and make them feel comfortable. This is also a good time to make sure you are pronouncing the guest’s name correctly and are calling them by their preferred name, or title, e.g. “Dr. Pain” versus “Wendy”. You should also agree on any non-verbal cues to communicate while you record the podcast (such as raising your hand to pause the recording or circling your hand to signal that they should ‘wrap up’ their point) without interrupting each other. But remember these cues will not be picked up for the podcast so don’t be afraid to add in the odd “yes”, “I see” and “okay” if your guest is deeply explaining a complex issue. It’s ok to interrupt politely if you feel our listeners may want further clarification.
Let the guest(s) know that this is a conversation, rather than a formal interview. Remind them that the podcast may be edited and that the length of the podcast is tightly controlled. We will only use the most relevant 10 to 30 minutes of content, so there is a need to be succinct. If guests want to re-record answers, this is possible with editing. However, it generally works best if it’s a relaxed conversation. Try to record the whole podcast in one take.
General podcast structure
- Start by introducing the podcast. The name of the podcast is ‘The 1Med Learn Podcast’.
- Introduce the presenters and any guests. Use full names and relevant job titles. Guests may introduce themselves.
- Introduce the main topic or condition. Outline any sub-topics and the order they will be discussed.
- Cover the main content and sub-topics within the discussions.
- Presenter(s) to wrap up with a summary of the discussions and conclusion to the topic. Thank the guests. Ask listeners to check out other episodes of the podcast.
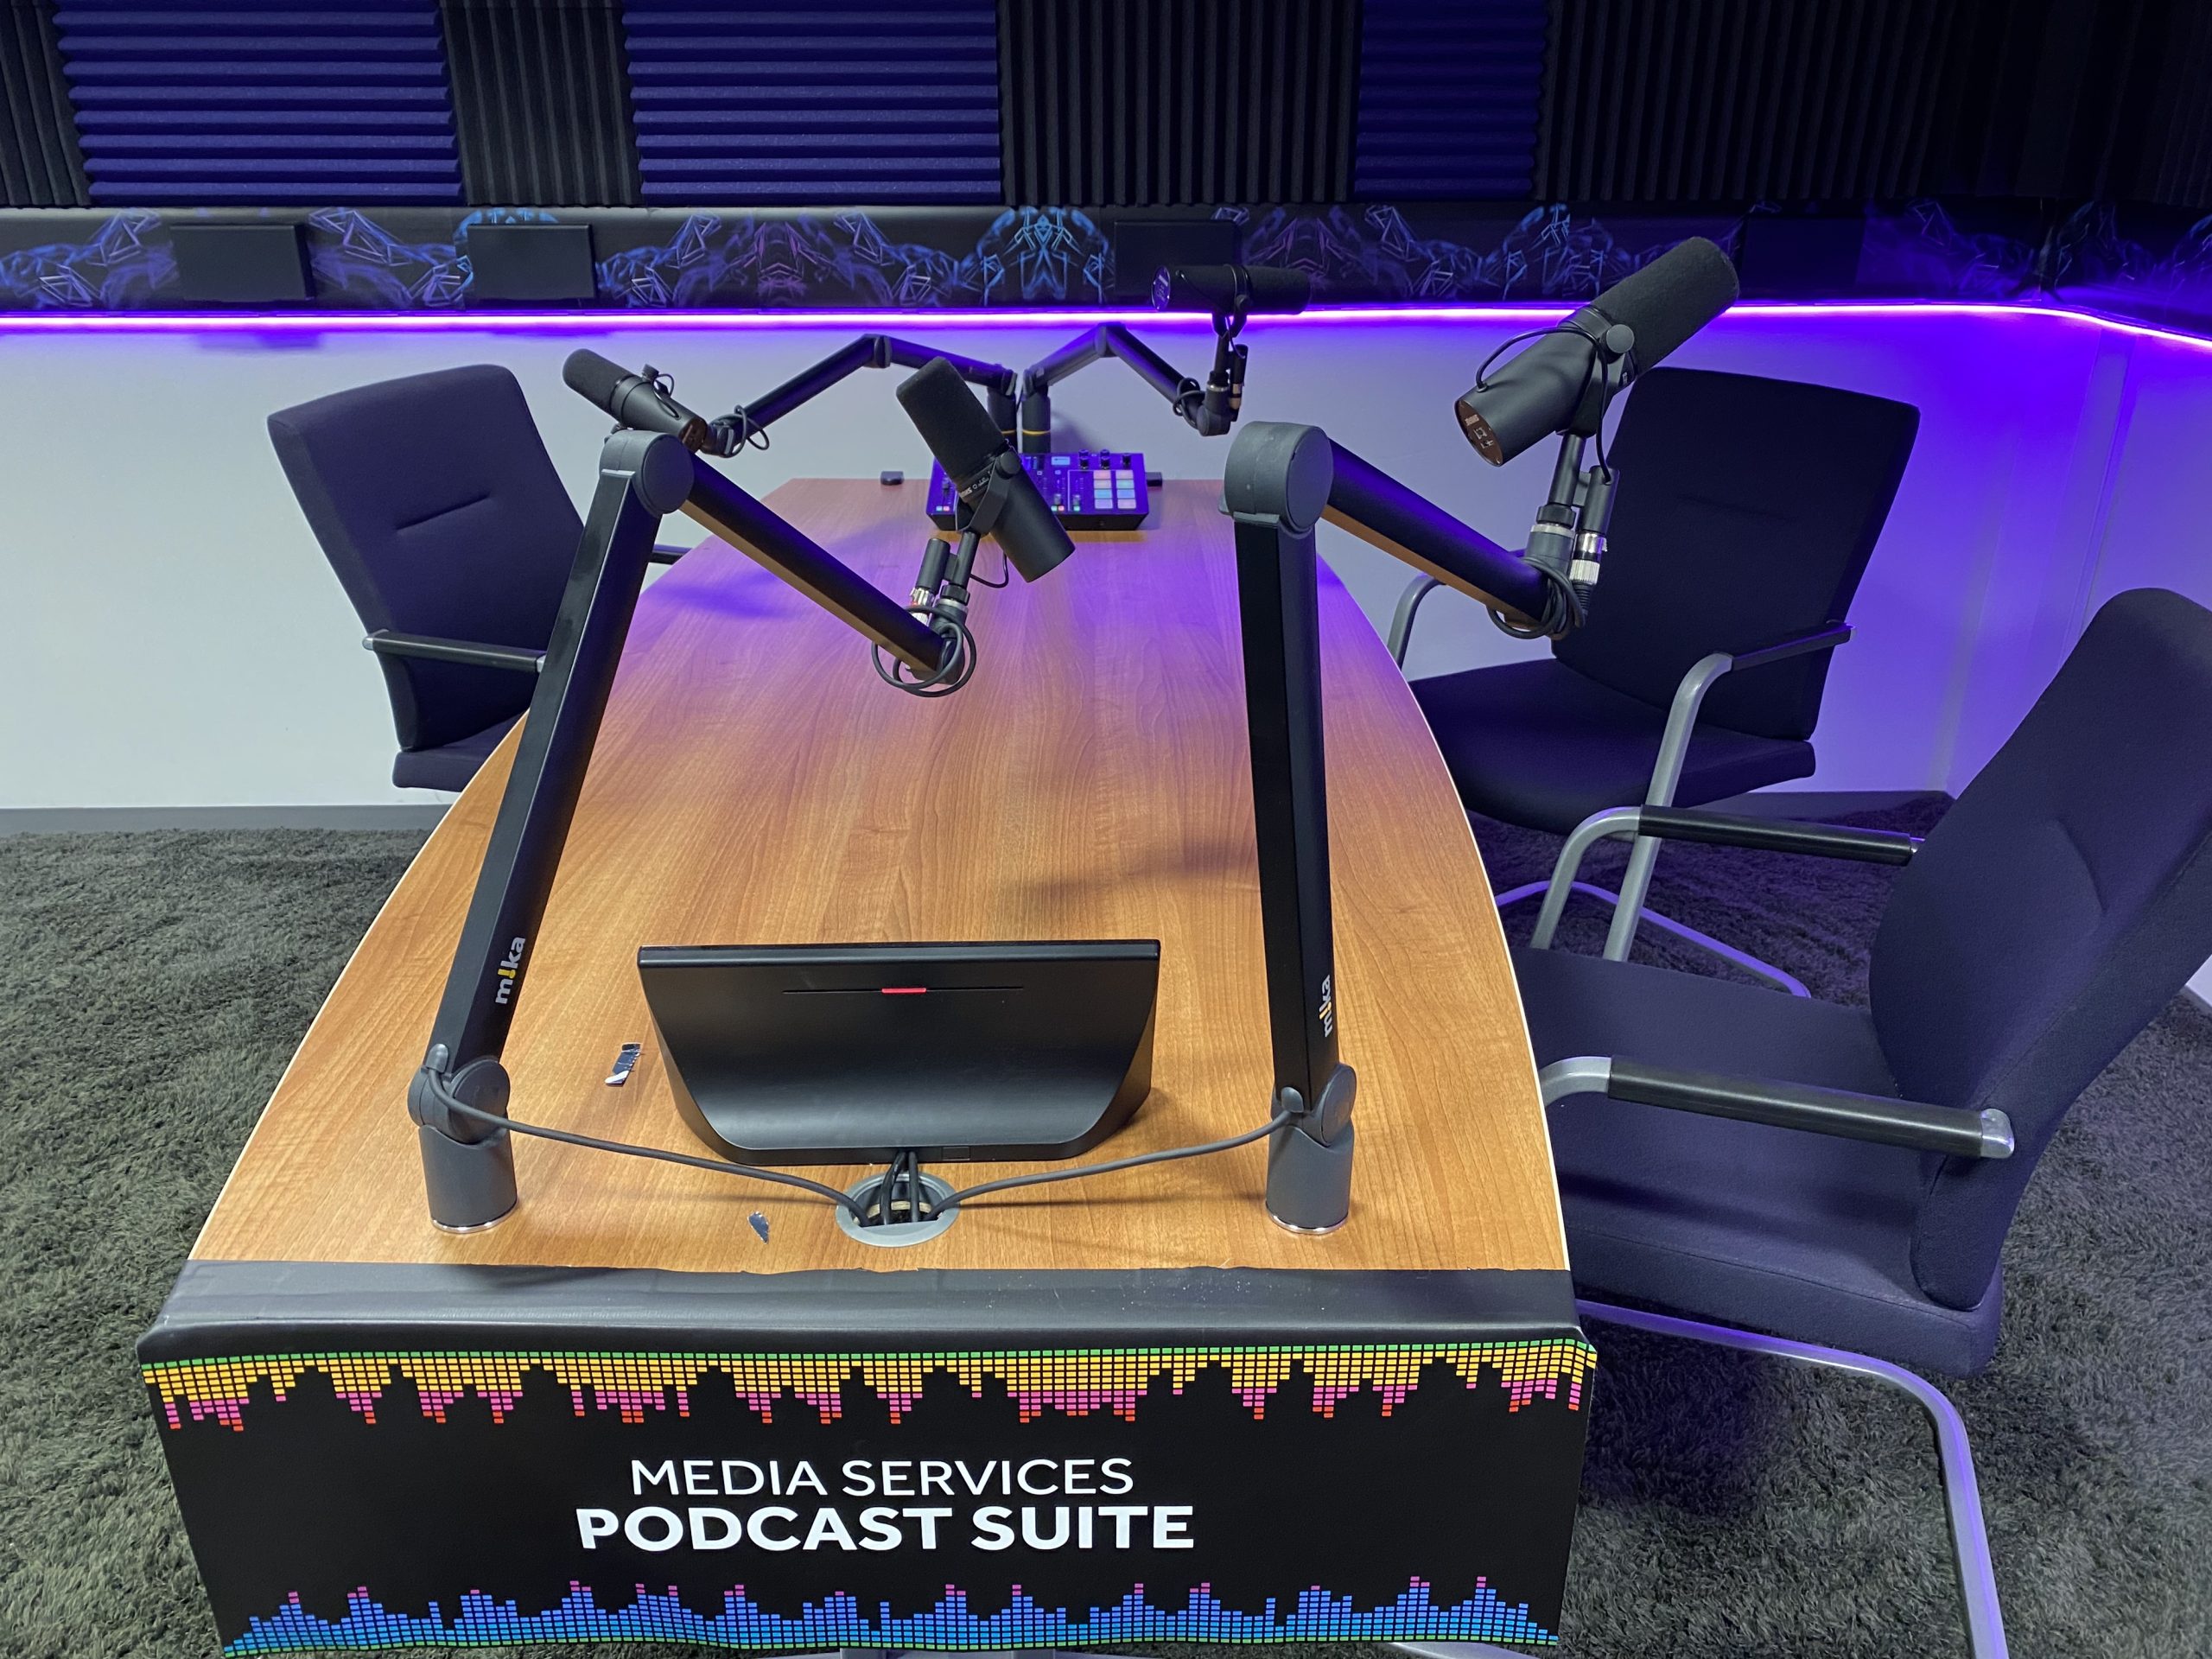
University of Manchester: Media Services podcasting suite
Location: Humanities Bridgeford Street Building (The University of Manchester, Bridgeford Street, Manchester, M13 9PL). Follow the signs to ‘Media Services Reception’, which is on the second floor (Room 2.73). View the Humanities Bridgeford Street Building on AccessAble here.
Any university member of staff or student can book this facility. To book, email mediaservices@manchester.ac.uk and ask for the ‘4-person podcasting suite with the round table’.
You need to make sure that everyone who is recording has their own microphone to speak into.
The facility is set up to record audio to a MicroSD Card, which you will need to provide. We can recommend a SanDisk High Endurance 100MBs MicroSD Memory Card – 32GB which comes with an adapter and retails at £10.99 at Argos. Remember to bring this to your recording session.
Sound checks
Before you start recording, make sure that everyone who is recording has their own individual microphone to speak into. Each microphone should be 15 to 30 centimetres from the mouth, depending upon how someone projects their voice. Do not share microphones, as this will create issues with unwanted sound disturbance and levels.
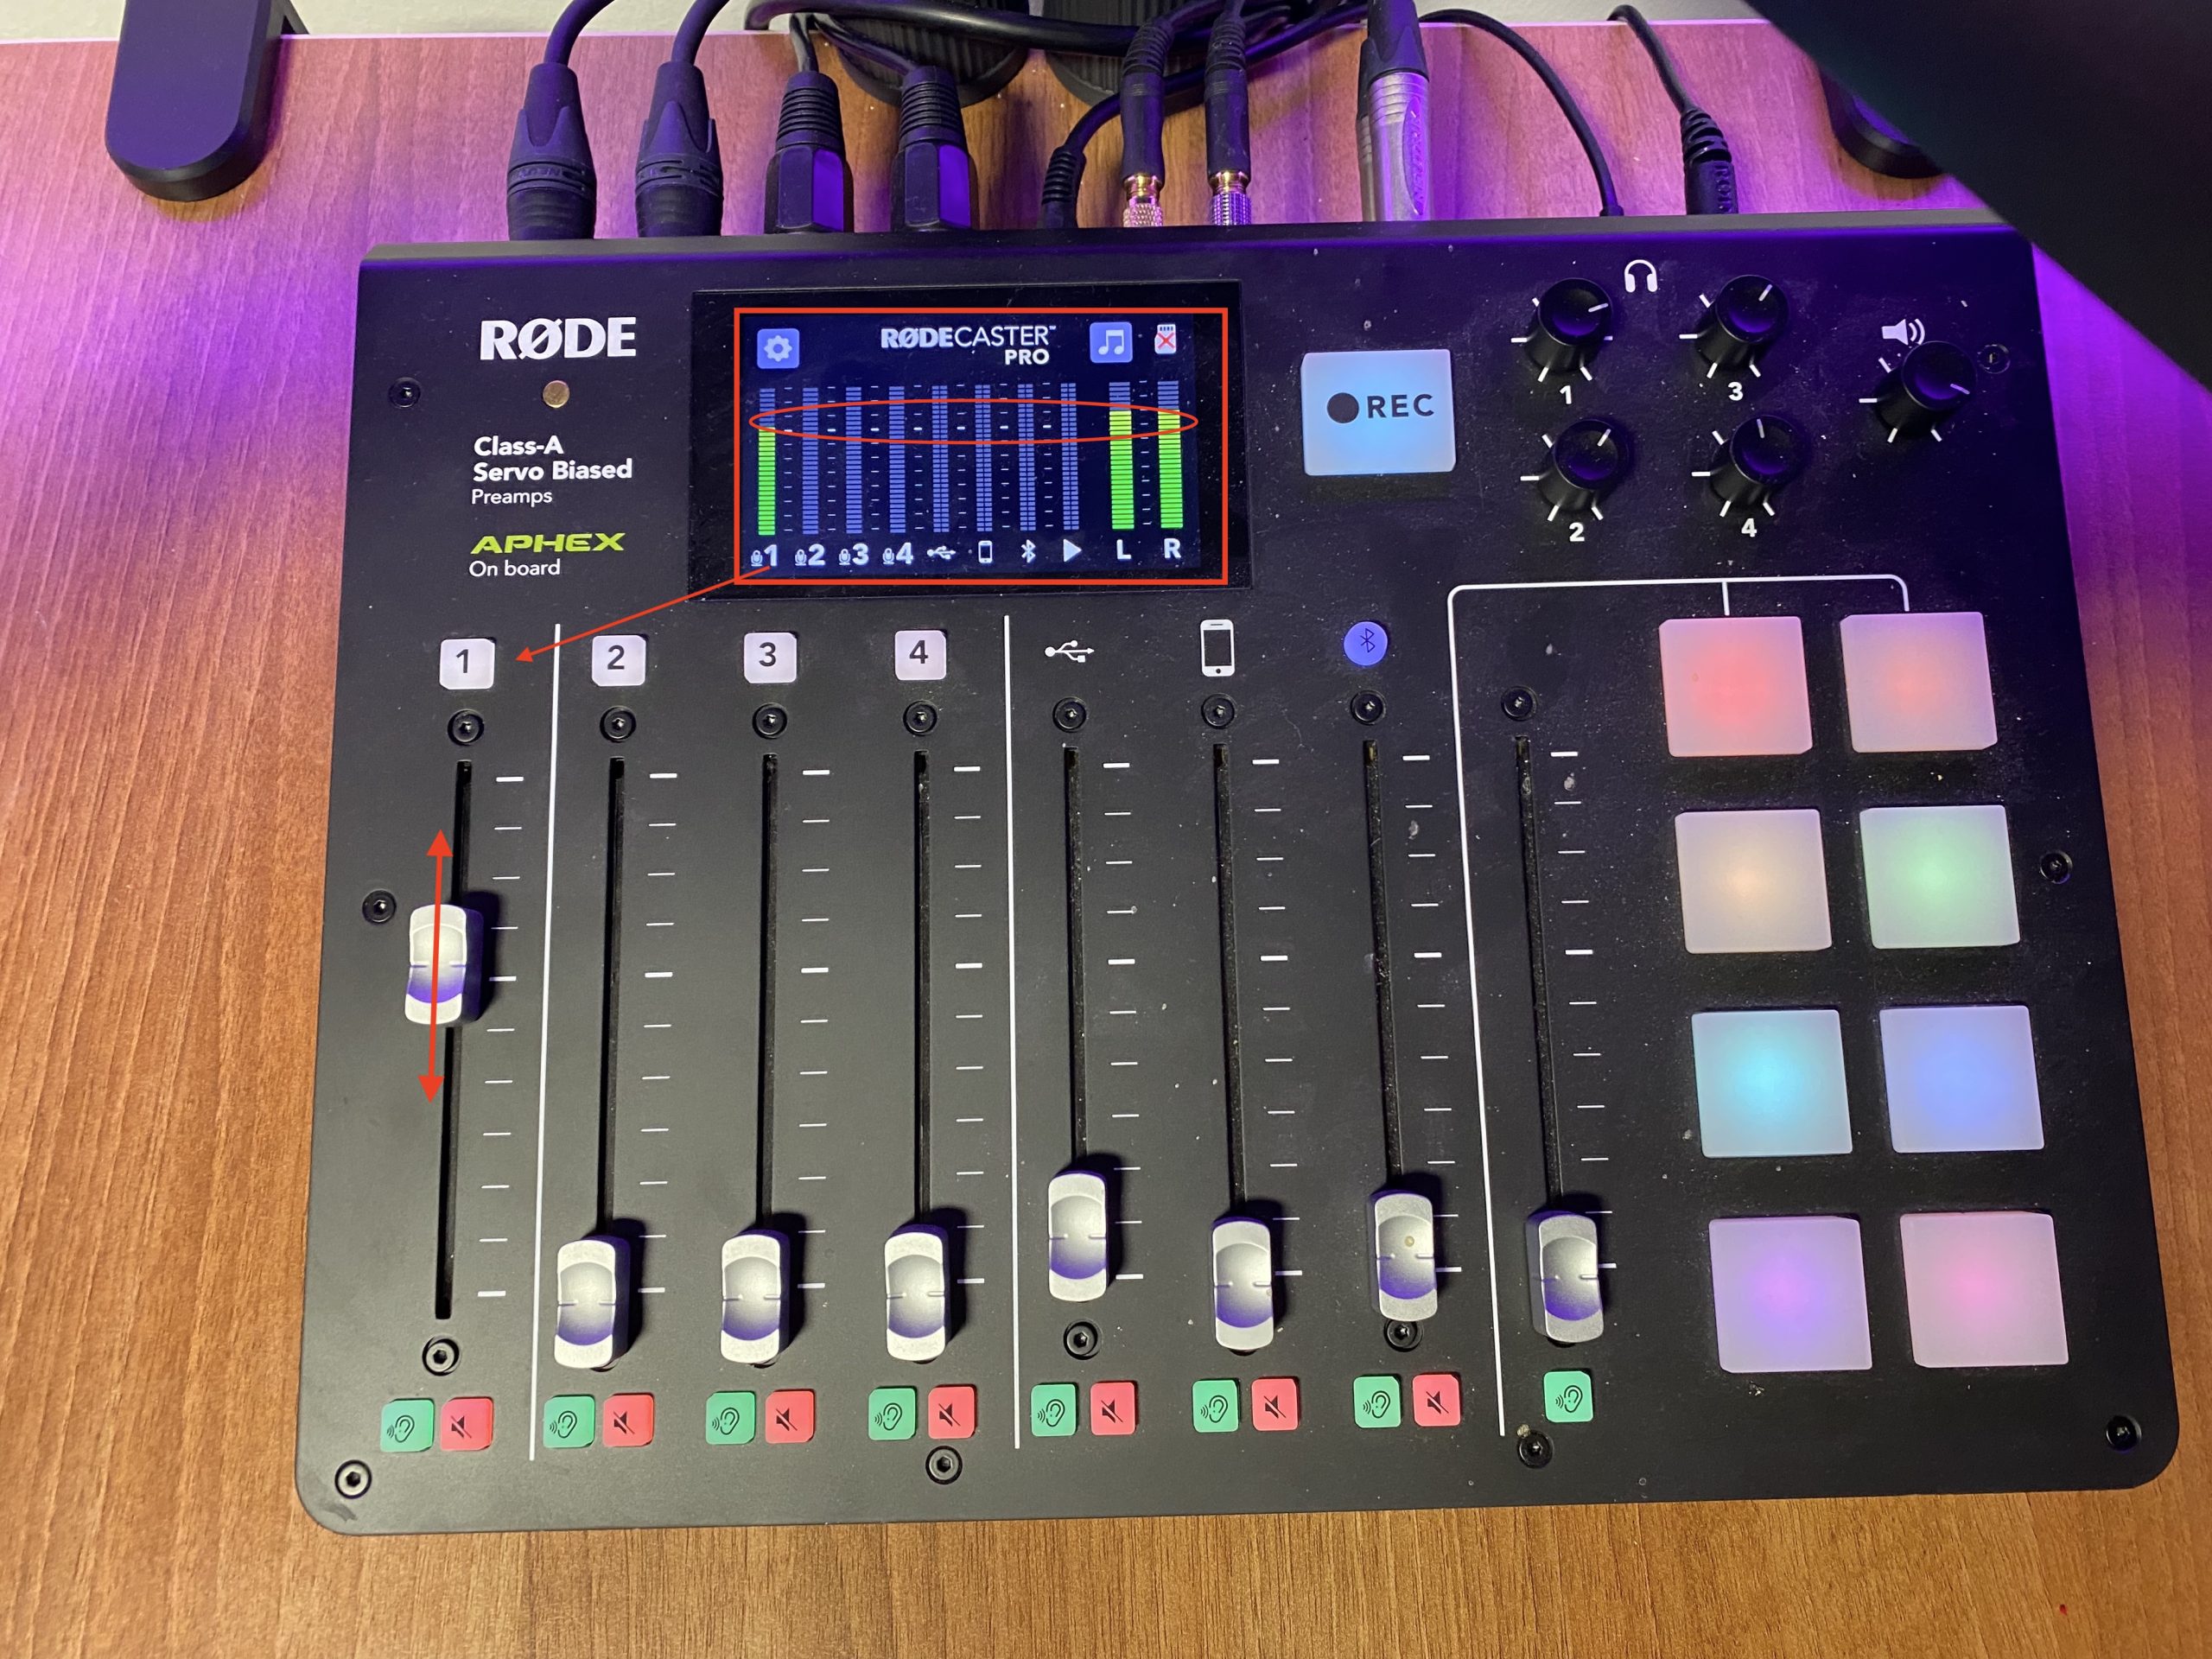
It is a good idea to do a sound check before you start recording, just to make sure that everything is working. Your sound check should check that all voices can be heard clearly. You should also check that everyone is recording audio at the same volume. The ideal volume is to have most of their audio peak between –18 to –6 (as indicated by the green arrow range in the image below, or the red circle in the image above). You may need to adjust the recording level for each microphone(s) accordingly i.e. make the person quieter, or louder (as indicated by the red circle around the slider buttons in the image below, or the red arrows in the image above). You can seek technical support from Media Services staff if you use their facilities. Alternatively, you can ask for a member of the eLearning team to accompany you during your recording session.

Echoing is sometimes a problem with virtual recordings, so it is best to wear headphones with a noise-cancelling microphone. If you do not have access to this type of headset, it is important to keep yourself muted unless you are talking. Your guest speaker should do the same if they are not using headsets. This is to prevent echoing, which can make the recording unusable.
Recording online (Zoom)
Tips
- Ensure that you have a strong internet connection to avoid lag, disconnections and/or low audio quality. Use an ethernet cable or sit next to your wireless router.
- Turning off video can preserve bandwidth if the internet connection is weak.
Please note: Zoom’s free version only records for 40 minutes, while a licensed account supports unlimited recording time. University Staff can upgrade their Zoom account to a fully licensed account by emailing mediaservices@manchester.ac.uk and requesting an upgrade. NHS Staff who teach university students can request a Pro account through the PRiME: Professionals in Medical Education Team. Email: mbchb.prime@manchester.ac.uk.
Settings can be adjusted to ensure the audio is good quality and make editing easier.
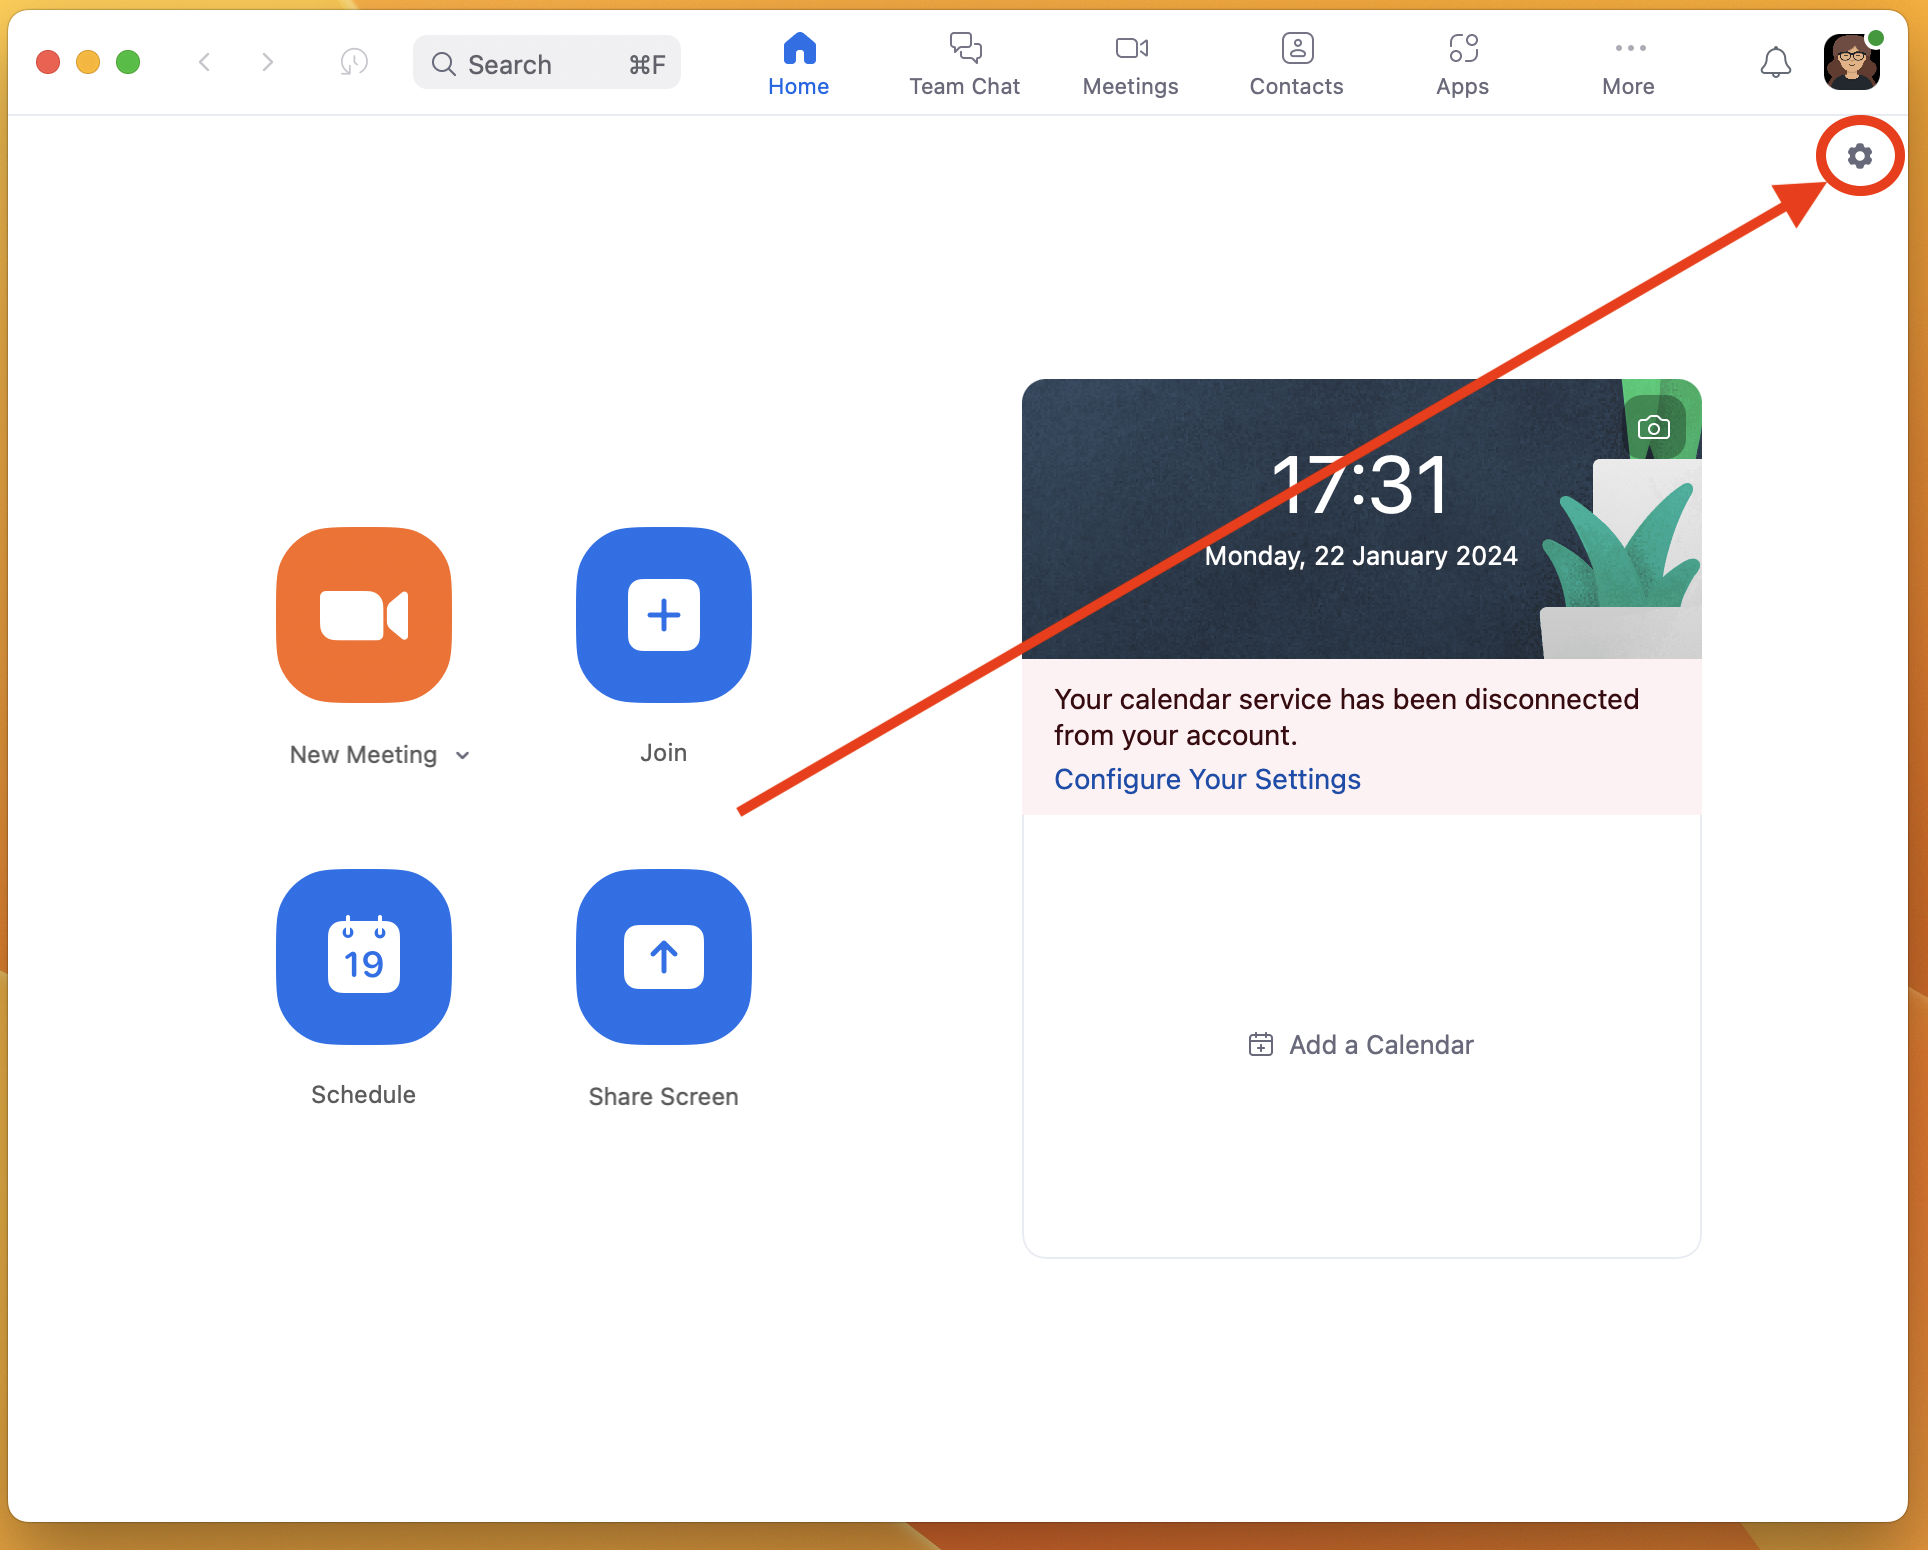
Zoom’s settings are accessed via the ‘cog icon’ on the dashboard (as per image above):
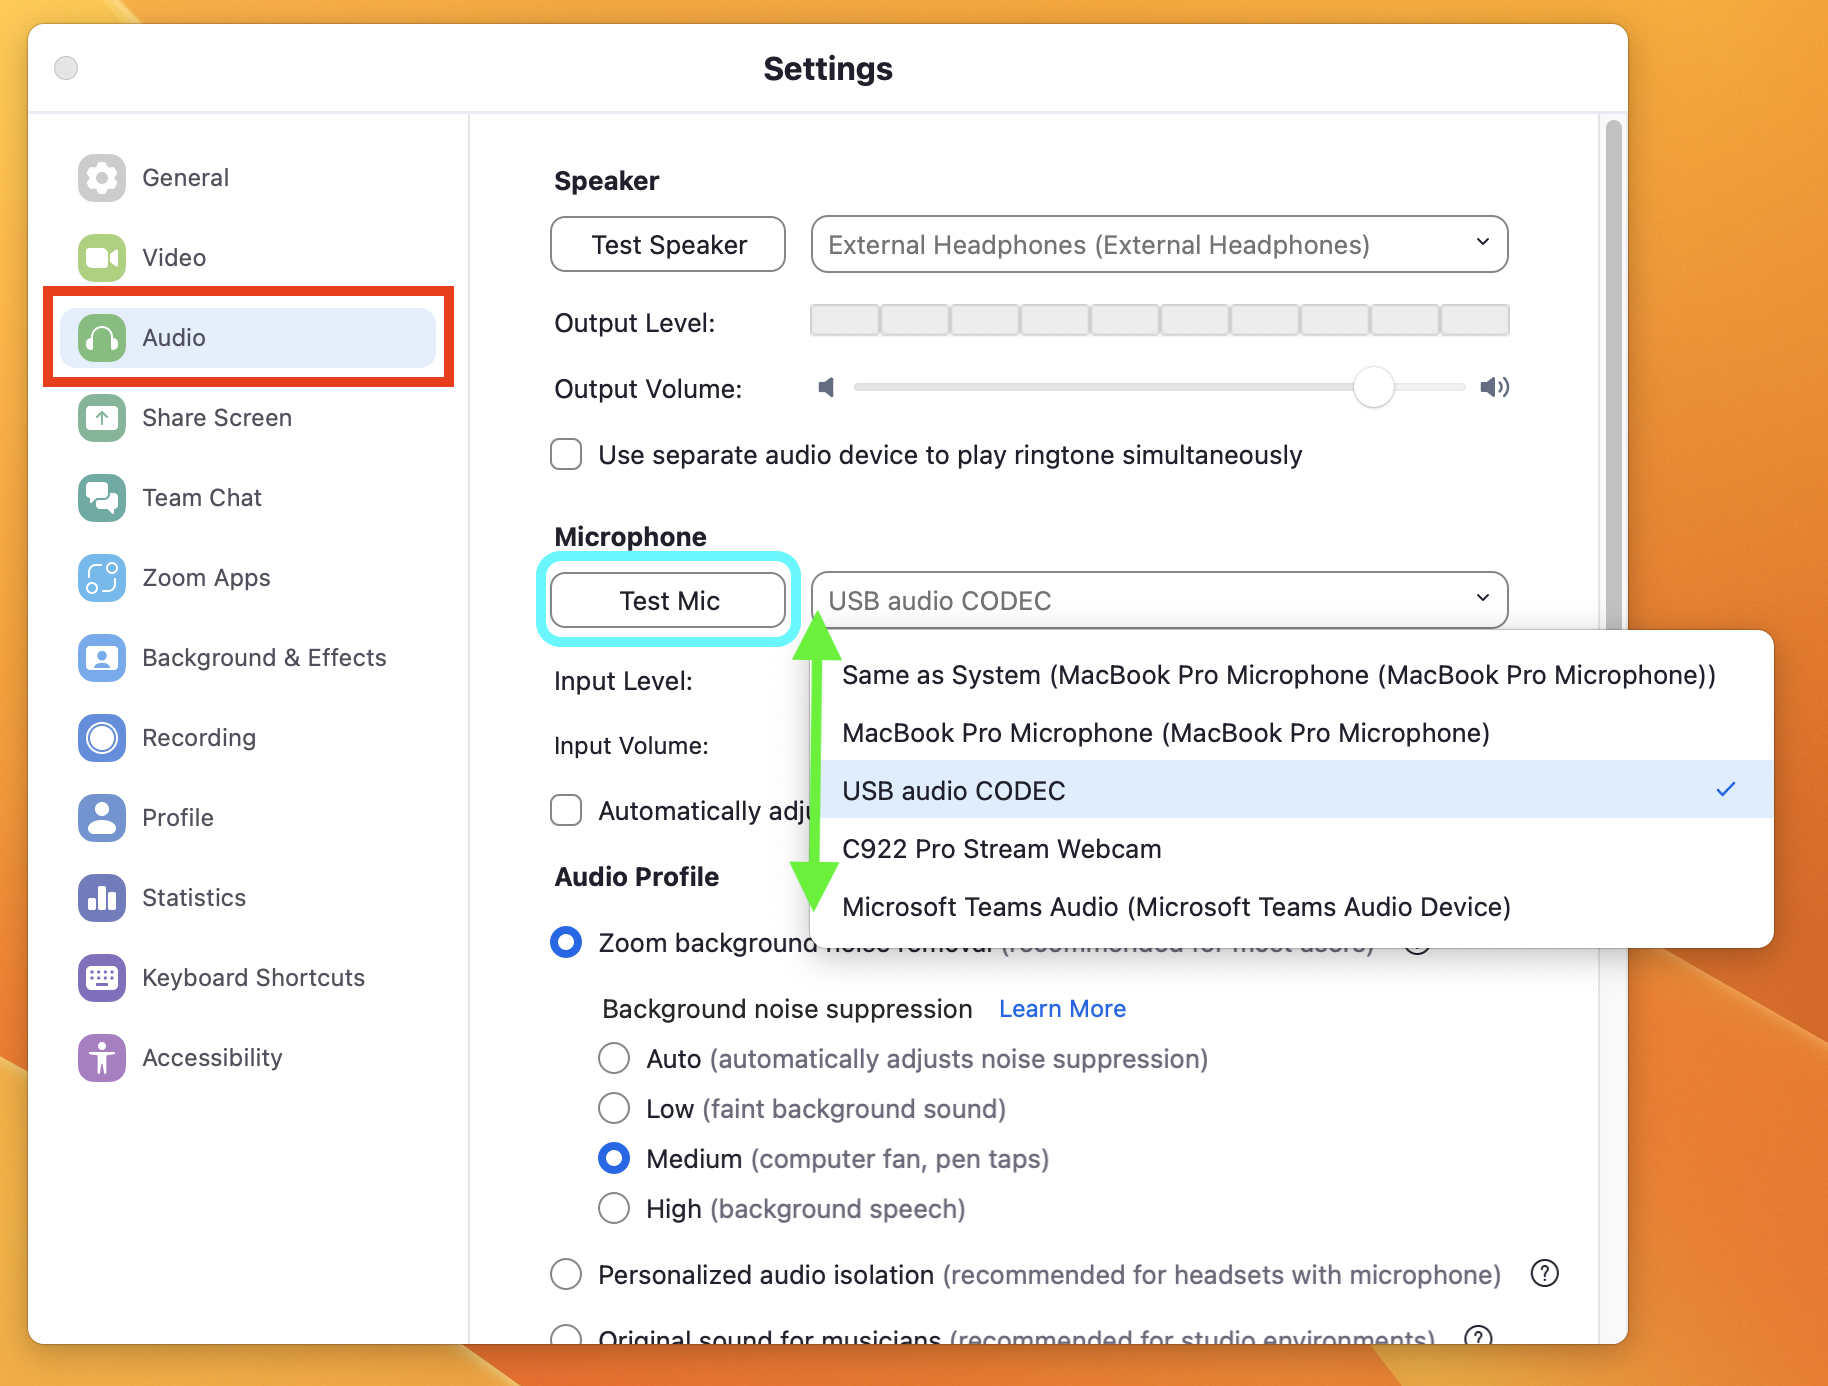
Navigate to the ‘Audio’ tab (as per the image above, highlighted with a red square):
1. Select the microphone you plan to use from the drop-down list (as per the image above, highlighted with green arrows).
2. Run a sound check by selecting the ‘Test Mic’ Button (as per the image above, highlighted with a blue rounded square).
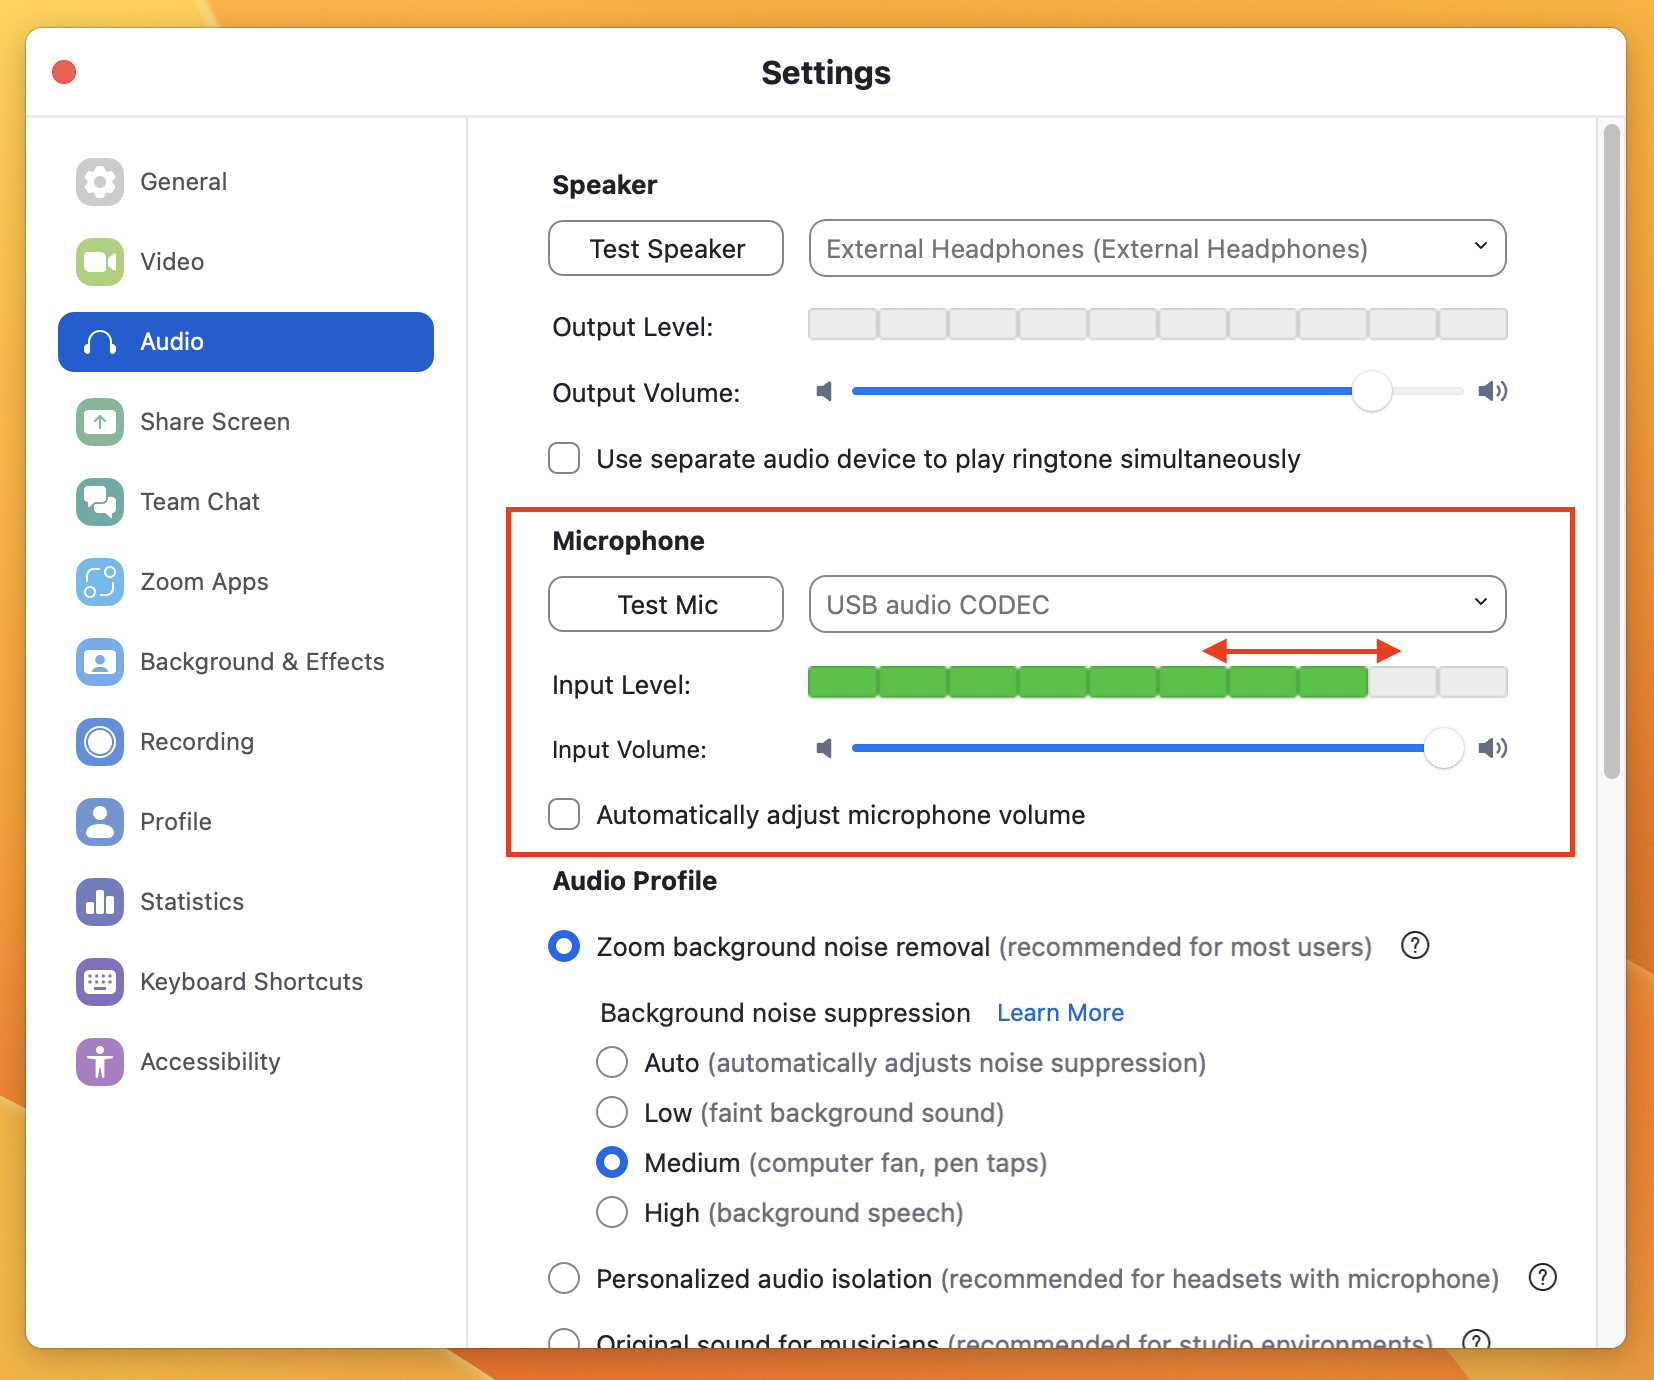
3. Check that the Microphone Input Level reaches somewhere between 50–75% into the level bar (as per the image above, highlighted with red arrows).
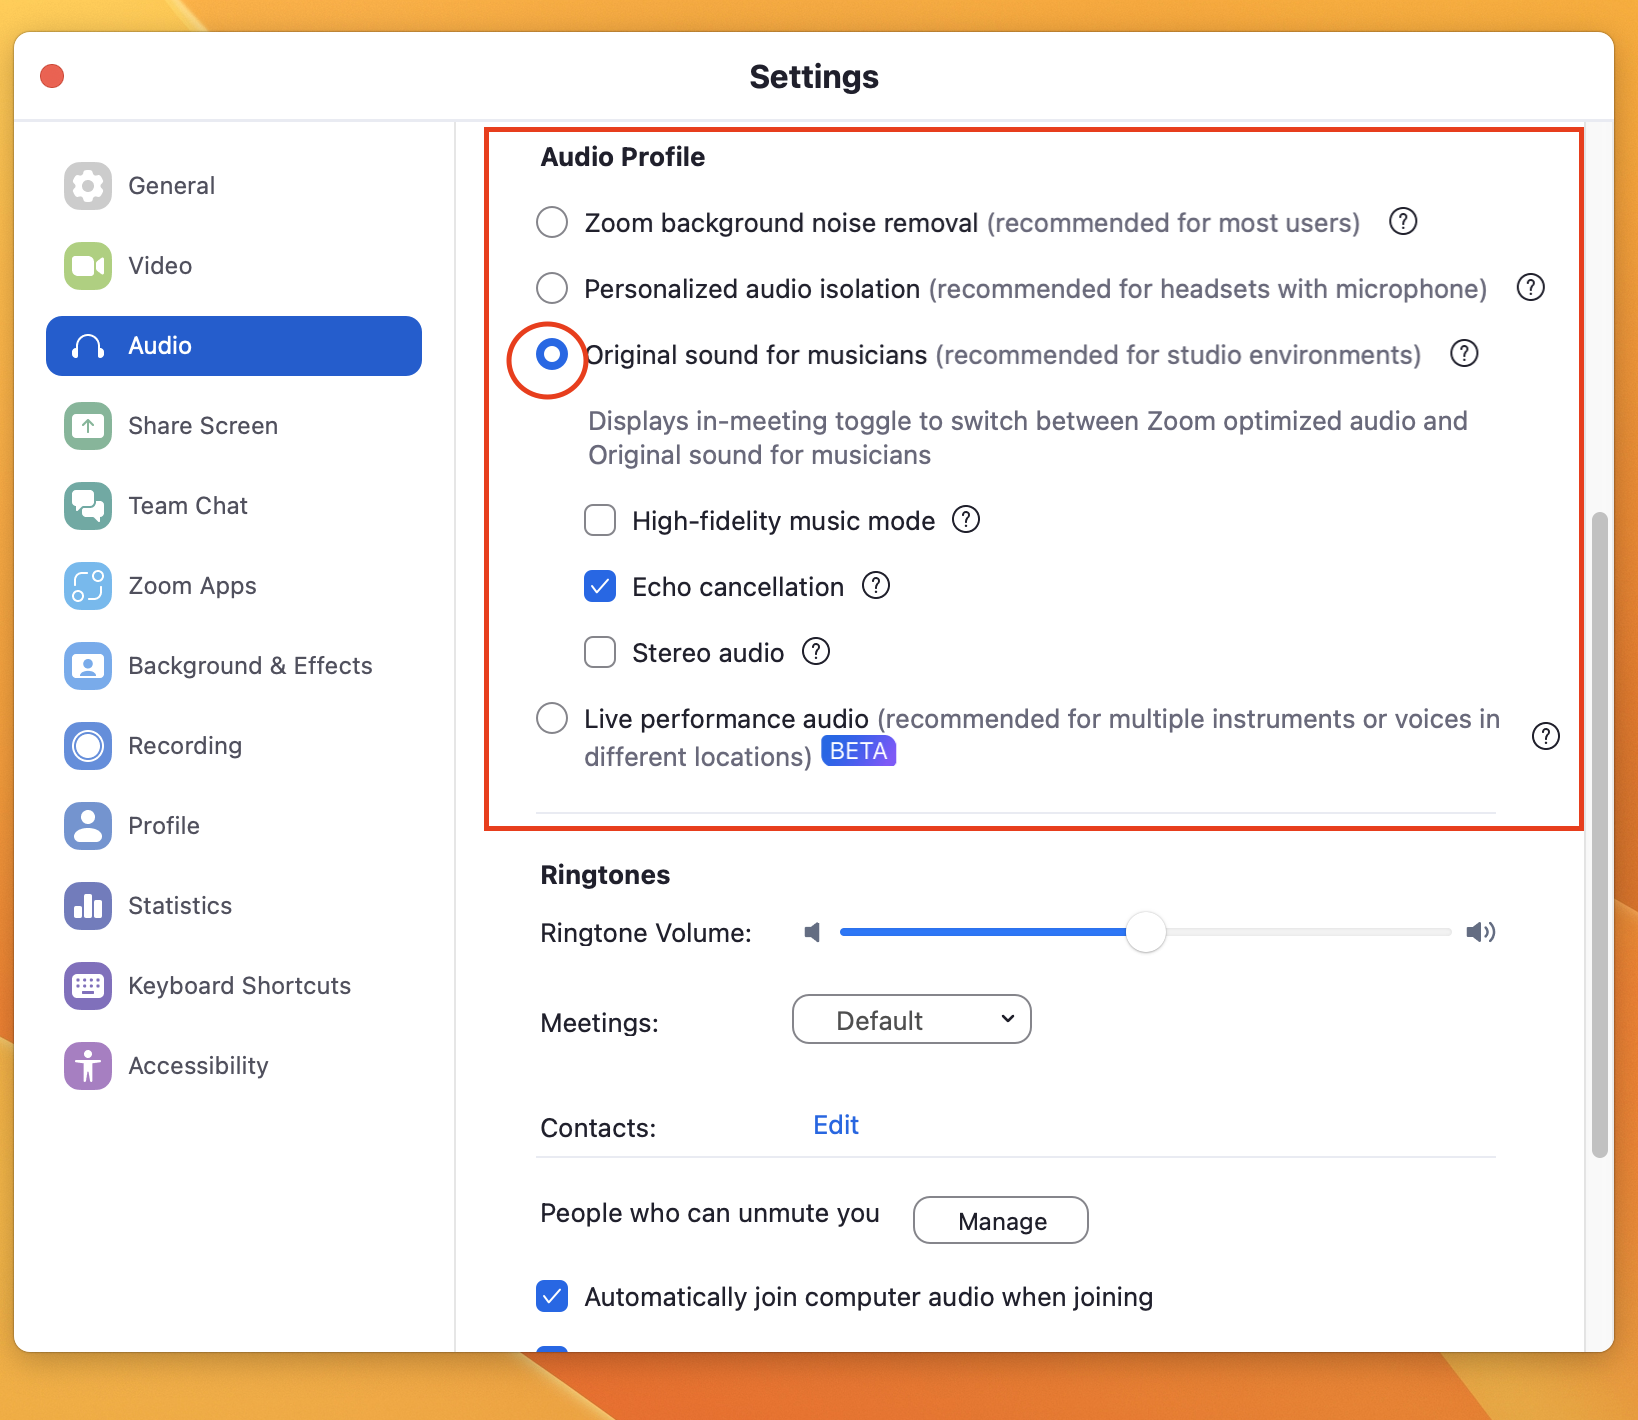
If a high-quality microphone is being used with a strong internet connection and you are confident with the podcasting set-up, removing Zoom’s automatic noise suppression can lead to a higher-quality recording because Zoom is less likely to ‘overcompensate’ and cut parts out. This can be done by selecting ‘Original Audio’ (as per the image above, highlighted with a red circle).
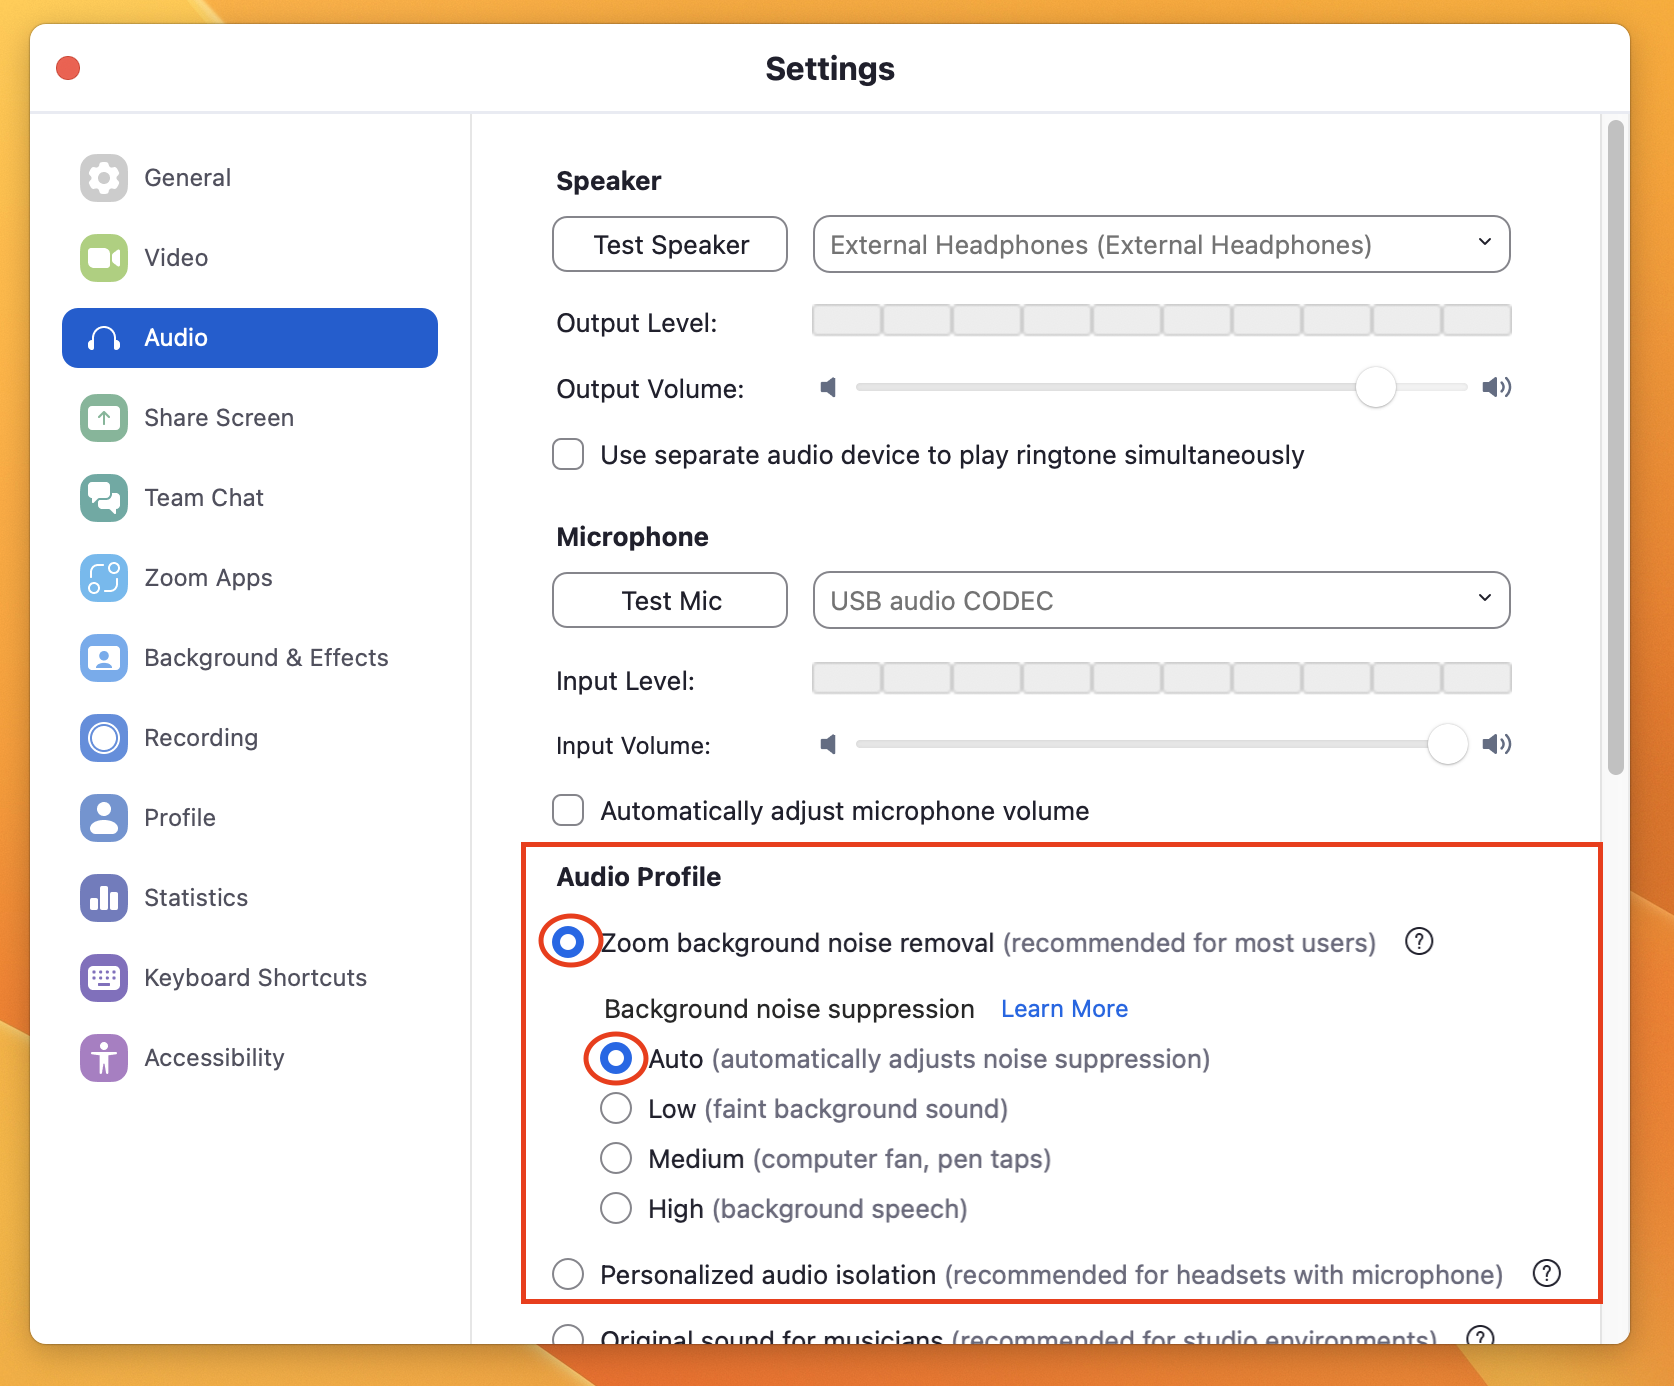
Otherwise, Zoom’s in-built noise removal will work fine (as per the image above, highlighted with red circles).
Please note: A noise suppression software such as krisp.ai (free version offers 60 minutes per day of noise suppression) can also be used to improve audio quality.
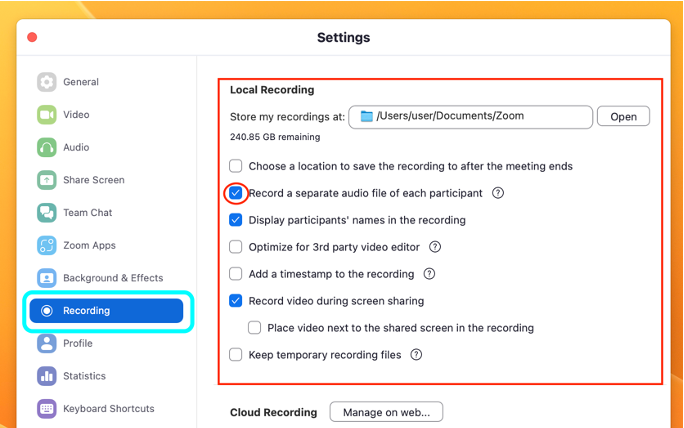
Navigate to the ‘Audio’ tab (as per the image above, highlighted with a blue rounded square).
Enable the ‘Record a separate audio file of each participant’ setting by selecting the tick box next to that option (as per the image above, highlighted with a red circle).
This records each participant’s own audio file, making it much easier to edit the podcast afterwards (i.e., if one person is louder, their track can be lowered to match the others).
Disclaimer regarding Zoom-based podcasts
Recording via Zoom has many advantages such as being able to record over physical distances (saving time, and energy), ease of use and user familiarity. However, there are some downsides to note. Zoom itself is primarily a virtual conferencing tool. As such, it uses audio compression to improve the flow of transferred data by making the audio file smaller at the cost of sound quality. This means that the audio quality would not be as high as it would be if recorded in a studio designed for podcast or audio production.
Post-recording (post-production)
Write a short summary of your episode, as follows:
- In this ‘In Brief’ episode, we talk to [NAME] about all things [TOPIC]
- In this ‘In Depth’ episode we talk to [FULL NAME(S) AND TITLES] about [GENERAL TOPIC] with a focus on [SPECIFIC TOPIC].
Edit your recording, as required. We recommend using Audacity. If you need support with editing, please contact Media Services (media.services@manchester.ac.uk), or eLearning (mbchbelearning@manchester.ac.uk) who may be able to provide advice, training, or support with editing.
Share a copy of the recording with the host and guest speakers for approval. This may lead to some re-editing. You also need to send a Podcast Release Form for completion.
Share (1) your short summary, (2) a copy of your edited recording, and (3) the completed ‘Podcast Release Form’ with the podcast review team, as follows: Podcast Upload Link (Dropbox)
Once the episode has been approved and published, we encourage the guest and host to share their episode on social media and with their networks to help maximise engagement.
Written by Rachel Heyes, and Connor Allen, FBMH eLearning (mbchbelearning@manchester.ac.uk) – January 2024