

What is this for?
Usually, video recordings uploaded to the Video Portal and embedded in Blackboard can be viewed by students on that Blackboard course immediately. However, you may have occasion to upload a video to the Portal that:
- you don’t want students to see automatically in their Blackboard course
- you don’t want students to find by searching the Video Portal.
For example, you might want to restrict access until a set time in the future, or make the video available only to certain groups of students.
This is where you need to upload a video privately.
Step 1: Uploading the video and selecting privacy option
If you have not uploaded to the Video Portal before, we suggest that you first view the guidelines on How to upload to the video portal. The method we show here differs only slightly from these standard instructions.
The main difference is that when you come to select the *Visible to: option from the dropdown box, you must make sure that you select ‘Only me’. With this option, the video will only be visible to you (and system administrators):

The following 1 minute video shows you the process:
Uploading a video to the Video Portal and setting it as private
Once your video has been processed, you will receive a confirmation email, as described in the standard instructions.
Step 2: Embedding the video in Blackboard
If you have not gone through this process before, you will need to work through the instructions on How to embed into Blackboard from the video portal.
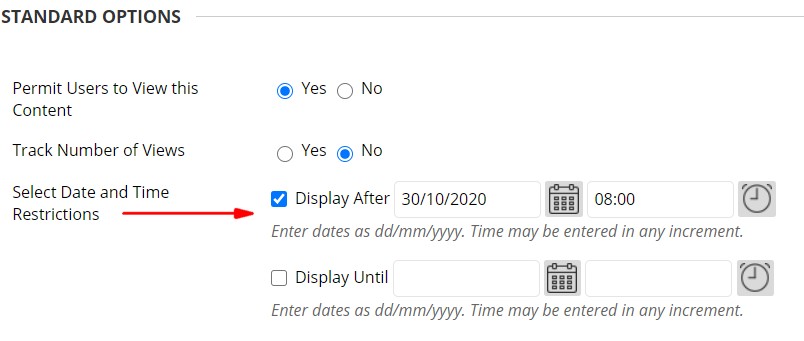
Step 3: Selecting date and time restrictions on your embedded video
If you are unfamiliar with this process, please work through our training guide on Personalising the Student Experience: Adaptive Release of Content – in particular the video entitled, Adaptive Release: Adding basic Rules to Content.
Once familiar with this process, you will be able to choose a date and time for the video to be visible to your students:
As an instructor, you will know whether the item is visible or not from the availability subtext shown under the item title, as shown in this example:

A further check of your settings can be achieved by using the ‘Enter Student Preview’ option. The item should not be visible and will remain this way until the date you selected has been reached.
It is possible to apply other adaptive release criteria to your embedded video, as shown on our Personalising the Student Experience: Adaptive Release of Content training page.