

What is this training about?
This page provides guidance on creating an interactive resource using features that are part of PowerPoint rather than a plug-in or outside system. By the end, you will know:
- What an interactive resource is
- What types of interaction can be built in PowerPoint
- The benefits of interactivity in a resource
- Why and how to use hyperlinks to introduce custom navigation
- Why and how to use triggered animations to hide or reveal content
- Some tips for success
- How to deliver interactive PowerPoint resources to your students
You will also be able to download some examples to explore in more detail.
Who is this training for?
This training is for anyone who wants to add interactive elements to an existing PowerPoint presentation, or to a new one they are creating. For those using the ABC curriculum design methodology, a short interactive resource could be used for investigation and/or practice, whereas a longer resource could blend acquisition with investigation and/or practice.
What is an interactive resource?
For the purposes of this training, the simplest definition is that an interactive resource shows content based on user input. This does not include simple linear navigation, where the user clicks on the Next/Back buttons to move through a piece of content, though user control over the pace of their learning is certainly important. Interactivity can also include quizzes, either by themselves or when they are used to control access to content.
FBMH has access to several licensed platforms that allow you to build interactive resources including SoftChalk Cloud and Nearpod. There are also a very limited number of licences for iSpring, a system for creating interactive resources based on PowerPoint slides. Other than quizzes and some other, less-used features, much of the interactivity in iSpring resources is made in PowerPoint itself.
That means it is entirely possible to build simple interactive content using PowerPoint alone. This guide provides guidance on the types of interactivity you can create.
How do I get PowerPoint?
You should already have access to it on your University-managed computer, and when you are given access to Office 365 you will be able to install a copy on your own computer. Office 365 also provides access to an online version that is pared down in terms of features but allows you to embed presentations in a webpage.
What types of interaction can be built in PowerPoint?
There are two main interactive elements: hyperlinks and triggered animations. Hyperlinks are useful for navigation, triggered animations are useful for showing or hiding objects on a slide. These two elements can be used together, and although they sound simple, they have powerful affordances. These will be described in more detail below, along with examples to see how they work in practice, which are available for download below.
What is the benefit of an interactive resource?
By placing control in the hands of the user, you can increase their engagement with the content because they are involved in its delivery. You are also able to harness constructivist pedagogies by allowing the user to explore the content at their own speed and in an order that makes sense to them, including the ability to go back and review things easily. This allows your learners to gain a deeper understanding of the material.
Why should I use hyperlinks?
Hyperlinks allow you to build more interesting navigation possibilities into your resource. A simple, linear structure is easy to construct but must be moved through one part at a time in a strict order. Accessing later content requires, at the very least, repeated clicking to get to the right place. Using an index slide with some hyperlinks to later parts of the resource allows users to get to the information they need more quickly, and gives them choice in the order they access the information. This is particularly useful for a resource that covers several topics, or several parts of the same topic, or for a large resource that can’t be further subdivided.
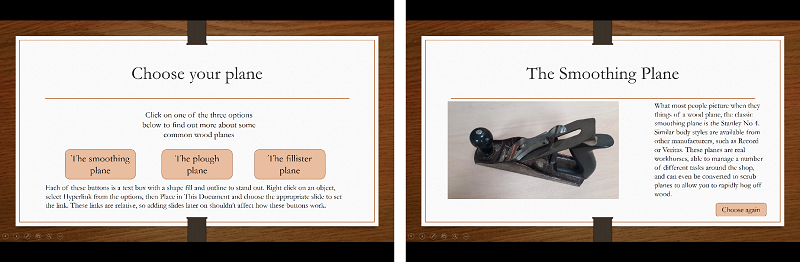
In this downloadable example of hyperlinked navigation, the index is on the left. Each button is a text box with a hyperlink to a content slide (eg on the right). At the end of each section of content, there is another text box with a hyperlink back to the index. This allows users to explore the content in the order they choose, or jump directly to the content they need.
How do you use hyperlinks?
Any object on a PowerPoint slide can have a hyperlink attached to it. Hyperlinks cannot be added to groups of objects, however, only to an individual one. That object can be a text box, an image or photograph, or something created by the drawing tools inside PowerPoint.
To add a hyperlink, simply right-click on an object, select Hyperlink, then choose Place in This Document and select where it should lead to. The link is relative rather than absolute, so if you reorder slides the link will still take you to the correct place.
Why should I use triggered animations?
Triggered animations allow you to show or hide content until a user clicks on another object on the slide. That showing or hiding is based on the PowerPoint animation system, so there are a multitude of options for how objects appear or disappear. Path animations can also be triggered, allowing objects to move on the slide rather than just appear or disappear. You can trigger several animations with a single click, and an object can be affected by a trigger set on itself.
These simple properties have powerful affordances. You can use triggered animations to allow users to move step by step through a sequence, pathway, or flowchart. You can use them to conceal parts of a text or image to promote reflection before revealing something, or hide something that some may find offensive or unpleasant. You can create hotspot-style images, where information appears when a marker is clicked. You can also create formative quiz questions, with immediate feedback.
Although many of these interactions can be created more quickly in dedicated software, some of those systems are expensive and difficult to learn. The output can also be hard to integrate into PowerPoint presentations. Using triggered animations can be complex for larger or more ambitious resources, but the end result is entirely PowerPoint-based.
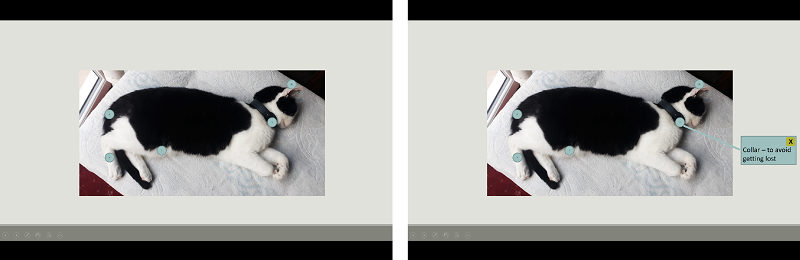
This downloadable example uses triggers to create a hotspot image. The resource appears initially as at left. Clicking a dot triggers an Appear animation for a line, text box, and an X icon. Clicking the X triggers a Disappear animation for the line, text box, and the X icon itself.
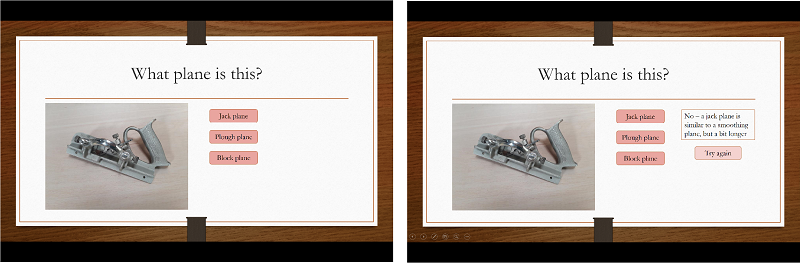
This downloadable example uses triggered animations to make a simple quiz. The main objects are the answer buttons, feedback boxes, Try Again and Continue buttons, all of which are text boxes. There is also a blanking box, which is a 99% transparent rectangle that sits over the answer buttons.
Initially, only the answer buttons are visible.
When an answer button is clicked, it triggers Appear animations for a feedback box, a Try Again or Continue button (as appropriate), and the blanking box
The blanking box is almost invisible but stops users from clicking on another answer. If the answer is correct, the Continue button is a hyperlink to the next slide. If the answer is wrong, the Try Again button triggers Disappear animations for the feedback box, the Try Again button itself, and the blanking box. With the blanking box gone, the user can try another option.
How do you use triggered animations?
There are instructions online for creating a triggered animation, but the mechanics are only part of the story. To create an effective resource, and save time back-tracking and troubleshooting, planning is vitally important. You need to know what each trigger is, and what animations should be triggered. You also need to know if you want users to have a way to start the process again from scratch.
Some tips for success
Hyperlinks and triggered animations will be new to many people. There are some things you can do to help make your own life easier, however:
- Do not make your resources unnecessarily complex. Preventing users from back-tracking through a branched navigation structure with hyperlinks is not possible without faking the pathways, which means multiple copies of every slide in those branches, for example.
- Plan carefully so you know in advance the structure that you are building. More complex schemes may be difficult to add into a pre-existing presentation, but simple things can be added in without too much difficulty.
- The selection pane is a fantastically useful tool. It allows you to rename objects, which means you can add a trigger to something you can immediately identify, rather than struggling to remember if this trigger is “Textbox 44” or “Textbox 45”.
- The animation pane is also useful for helping you keep track of your triggered animations.
- If you are using hyperlinks throughout your resource, and do not want users to move through sequentially, you should untick On Mouse Click under Advance Slide in the Transitions menu.
- If you want to include Next/Back buttons that use hyperlinks, you can add these to the slide master to save having to add them to every slide yourself.
How do I get an interactive resource to my students?
The simplest method of getting your resource to your users is to save it as a PowerPoint Show and upload the file to Blackboard. When opened, a PowerPoint show will automatically start as a full-screen presentation. This makes it quicker for users to open the show and reduces their ability to change something before viewing it. Remember, however, that you can still open the file as normal from inside PowerPoint.
Office 365 does give you the ability to embed a resource using an embed code, but there are limitations to this. A public link is only valid for 30 days before expiring, after which it needs to be recreated. This means public resources will need some maintenance. Links for University of Manchester users can last indefinitely but will require the user to log in. An example is embedded below, so you can see how it works and decide if you are happy with this option.
This is an embedded Microsoft Office presentation, powered by Office.
If you do choose to embed a resource, instructions are available online.
There are some further limitations on embedded PowerPoint shows. Narration does not appear to work well, for example. The way that objects are handled is also slightly different, with triggers on overlapping objects being particularly badly affected. Triggers and hyperlinks can always be clicked, regardless of whether their object is visible. If you have more than one trigger or hyperlink in the same space on the slide, only the top one will be clickable. Although testing is always recommended before uploading an interactive resource, more extensive testing is necessary for embedded shows.
Example resources
The files below are short examples of what you can build with hyperlinks and triggered animations. Download one to explore how each resource is built.
This example uses hyperlinks to give the user control over the order they view content.
This example uses triggered animations to create a hotspot-style image.
This example uses triggered animations to create simple formative quiz questions.
This example uses triggered animations to create an interactive flowchart.