

Some straightforward methods of creating a video lecture are described here, and they involve either just PowerPoint or PowerPoint (or other application) and Zoom. Pros and cons for each are listed.
PowerPoint video export
Pros:
- Complete control over recording; can stop, start, remove sections and repeat slides easily.
- A familiar, well-supported application to work with.
Cons:
- No webcam option.
- Does not record your pointer.
- For reliability, you would benefit from being on Windows 10 or recent OS X with up-to-date Office 365, although this process does work on older versions.
Overview
Follow the Basics guide to set your scene, lighting and other considerations first, then:
- Record presentation voiceover and timings in PowerPoint
- Export as MP4
- Upload to the Video Portal
Detailed instructions
Recording PowerPoint video lectures
Extras
Generate automatic closed captions on the Video Portal
The accuracy with technical language is not consistent but it is possible to edit/replace subtitles files.
Edit in ShotCut
Add logos, text overlays or welcome slides – before uploading to the Video Portal.
This produces a slides and voice type recording with no option to include webcam footage.
Zoom lecture recording
Pros:
- Can record any of your screen, not just PowerPoint.
- Take advantage of the built-in transcript function.
- Zoom is fairly simple and familiar.
- Can include the webcam in the recording.
- Quick – one take and you’re done. Good for confident speakers (and for uses where small mistakes don’t matter).
- Records the pointer.
- Can switch between webcam and screen sharing using the Zoom controls and the recording will reflect this change, although this isn’t super quick.
- Can generate an editable transcript (for cloud recordings only – turn this feature on in advance of the session).
Cons:
- Mistakes are captured unless you start again.
- Audio and video quality depends on your internet connection and is generally of a lower standard than direct recordings.
- The webcam recording is quite small when you are sharing the screen.
Overview
Follow the Basics guide to set your scene, lighting and other considerations first, then:
- Set your PowerPoint presentation to show in a window
- Set your Zoom local / cloud recording preferences to display your webcam image to the side of the screen share
- (Optional extra) Set Zoom to generate audio transcripts (one time enable, always on after)
- Use the desktop Zoom client, share your PowerPoint and record yourself to either your hard drive or the cloud.
- If using the cloud (required for auto transcripts), download the resulting recording and transcript from your account, under ‘Recordings’ on the website zoom.us.
- Upload your video and .vtt transcript file to the video portal and embed it into your course.
Zoom Tip: Remember to use an ethernet cable when possible!
Detailed instructions
Set the preferences for Zoom local or cloud recordings depending on which you are using, as follows.
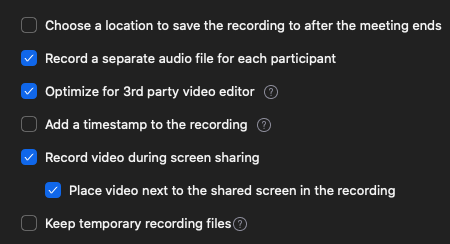
Local Recordings (Zoom app Settings > Recording):
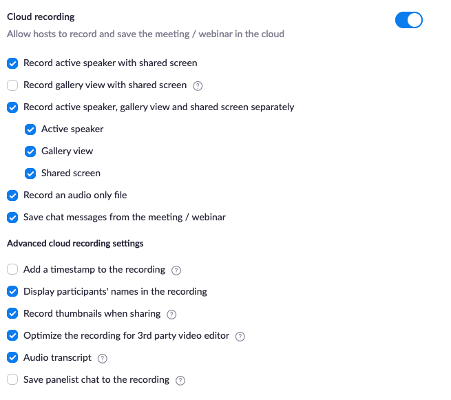
Cloud Recordings
The options we’re most concerned about in this method are to make sure Record active speaker with shared screen and Audio Transcript are checked.
Displaying the participant’s name is at your discretion.
Using Zoom to Record Presentations
Extras
Use Zoom auto-captioning for editable captions / transcripts
Check, edit and download the transcript on Zoom.us, and upload the .vtt file to the Video Portal alongside the video (under advanced options).
Enable this before recording.
Generate automatic closed captions on the Video Portal
The accuracy with technical language is not consistent but it is possible to edit/replace subtitles files.
Edit in ShotCut
Add logos, text overlays or welcome slides – before uploading to the Video Portal.
This method uses a presentation application (usually PowerPoint, but could be anything) captured by Zoom, alongside your audio and, optionally, the webcam as a small addition to the side.