

Updated: 03/11/2021
Turnitin Feedback Studio enables staff to check originality and mark students’ work online. With Feedback Studio, staff can annotate directly onto the document using text, add Bubble and QuickMark comments, leave typed or audio general feedback, provide further feedback with a Rubric or Grading Form and assign grades.
Access a Feedback Studio assignment inbox
1. Log in to your Blackboard course.
2. Navigate to the Assessment/Content Area in the left-hand menu and locate the relevant submission inbox (web link).

3. Clicking the link will display the assignment inbox.

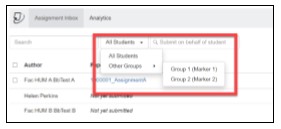
4. You will see all submissions in the inbox by default. However, it is possible to see a smaller section of the inbox, provided that groups have already been set up accordingly in Blackboard. To view a marking allocation by group: where ‘All Students’ is displayed, click to show the dropdown list. Hover your mouse over ‘Other Groups’; if groups have been set up in Blackboard, the group names will be displayed. Select your group name to see only the assignments in your allocation.
5. To grade the submission, click on either the assignment title under ‘Paper Title’ or the pencil icon under the ‘Grade’ (ideally, Student IDs will have been included in the assignment title). A new Window or Tab opens up displaying the Feedback Studio document viewer.

Commenting Tools
Feedback Studio has several tools that will enable you to deliver feedback effectively on a student assignment in a variety of ways.
1. In-context Marking Tools
Click anywhere on a paper to reveal the in-context marking tool, where you can then click on the relevant icon to leave a mark on the page.
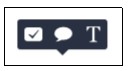
a) Inline comments allow you to leave text directly on top of your student’s paper. From the in-context marking tool, choose the T icon and then begin typing your comment. The comment will automatically be saved. You can move a comment by clicking and dragging it to where you would like to place it.
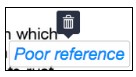
i. To delete an inline comment, hover over the comment with your mouse and click the trash can icon that appears above the comment.
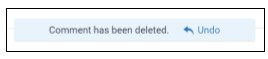
ii. If you accidentally remove a comment, you can undo this change by clicking Undo in the notification that appears upon deletion, located at the top of the paper.
iii. Add Strikethrough Text: Select a piece of text – you have the option to strike through this text, instead of adding an inline comment. Choose the S icon to strike through.
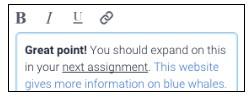
b) Bubble comments allow you to connect a comment to a section of text. To add a bubble comment, highlight a section of text then select the speech bubble icon.
i. With bubble comments you can add text and hyperlinks, and apply simple formatting to your comment. Highlight the text you wish to format and use the formatting tool to bold, italicize, underline, or hyperlink.
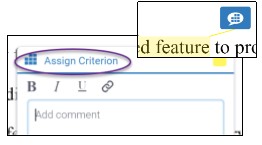
ii. Note: If a rubric is attached to the assignment, you can choose to assign an individual marking criterion from the rubric to the bubble comment. This will help students to contextualise why you are making this comment.
iii. Click the Assign Criterion button at the top of a bubble comment box. This will reveal a list of criteria, from which you can select one. The bubble comment now appears on the paper displaying the rubric icon.
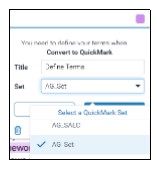
iv. You can convert a bubble comment to a reusable QuickMark. To do this click Convert to QuickMark from the bottom right-hand corner of the bubble comment box.
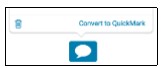
v. A menu will appear within the bubble comment box. Set a title and assign the QuickMark to a specific set. Click Save to convert your bubble comment to a QuickMark. Your QuickMark will now appear in the paper.
vi. If your QuickMark has a criterion assigned to it, the rubric icon will appear alongside it.
c) QuickMarks allow you to create a library of feedback comments that might be applicable on multiple occasions, to multiple students, across multiple classes and assignments. You can add a QuickMark to both a selection of text and the full paper.
i. To add a QuickMark to a selection of text, highlight the section of text you would like to associate the QuickMark with and click the QuickMark icon from the in-context marking tool.

ii.
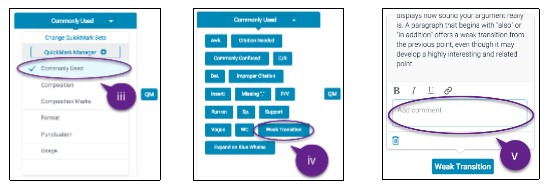
iii. By clicking the set title at the top of the QuickMark box, this will reveal a dropdown list, allowing you to change the active library.
iv. Click any of the QuickMarks within the library to add it to the assignment.
v. To leave a bespoke or individualised comment alongside your QuickMark, click your QuickMark title from the paper. Click in the Add comment field to begin typing.
vi. To save your addition/comment, click anywhere outside of the comment field.
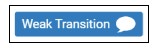
vii. An individualised comment left alongside a QuickMark is identifiable by a speech bubble alongside the QuickMark title.
viii. To Delete your QuickMark, open the QuickMark and click the trash can icon in the bottom left-hand corner of the QuickMark box.
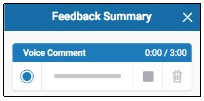
2. Feedback Summary Tools
A written summary of feedback can be added to student work, using the Feedback Summary area. It’s also possible to add a voice comment if you prefer. Voice Comments can be useful for meeting the needs of different learning styles and specific support requirements.
Add a Feedback Summary by clicking the Feedback Summary icon to open the side panel.
Option 1: To leave a Text Comment, simply click in the Text Comment box provided, and begin typing. To delete it, use the trash can icon.
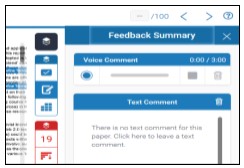
Option 2: To leave a Voice Comment, click the record button on the left to start recording. Make use of the pause and stop buttons to pause for thought.
3. Rubrics and Grading Forms
A rubric is an assessment matrix that uses a scale, criteria and descriptors to assess a piece of work. Rubrics can help students to visualise and evaluate their level of success in different areas of a piece of work, for example, structure. Students are then able to see at a glance how to make improvements for future assignments.
Grading Forms enable you to provide free-form feedback and scores to your students against a set of criteria.
i. From the online grading toolbar, select the rubric icon to open the Rubric side panel.
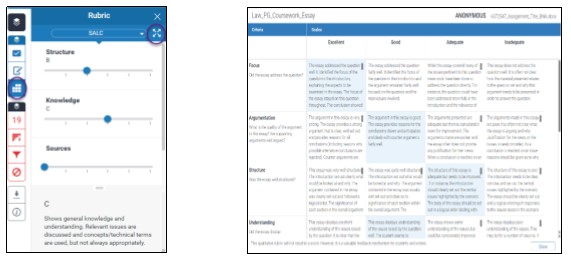
ii. Click the expand icon to see the expanded view in a separate window. Click to highlight a point on the scale for each criterion.
THE END